Prep time: 30 minutes
Cook time: 35 minutes
Total time: 1 hour 5 minutes
Servings: 12 servings
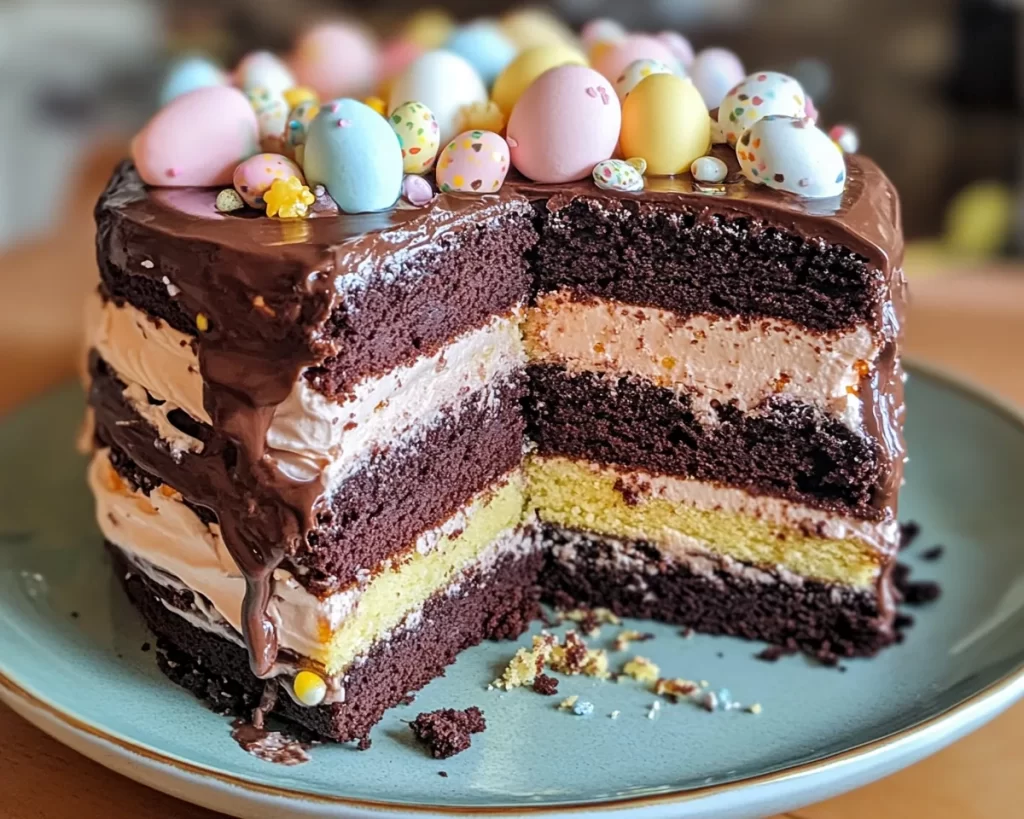
The first bite of a homemade chocolate cake can transport you back to your childhood—maybe it was a birthday celebration, a holiday gathering, or just a sweet moment shared over family dinner. This Easter Chocolate Layer Cake brings that nostalgia full circle, offering not just a dessert but a delightful centerpiece for your festive table. Rich layers of moist chocolate cake, decadent frosting, and a whimsical touch of seasonal decorations ensure that every slice becomes a part of your cherished memories.
In this recipe, you’ll learn how to create a show-stopping dessert that showcases layers of light and moist chocolate cake, complemented by a rich and creamy frosting. Along the way, I’ll share tips on how to add your own personal flair to the cake while ensuring that it makes a splendid addition to your Easter spread. With various variations and substitutions, you’ll have the freedom to adjust ingredients to fit your dietary preferences or what you have on hand.
What Is Easter Chocolate Layer Cake?
The Easter Chocolate Layer Cake is a delightful dessert that perfectly harmonizes with the festive spirit of the holiday. Traditionally, layer cakes are made from alternating layers of cake and frosting, and in this case, we will use a moist chocolate cake paired with a silky chocolate buttercream frosting. The cake itself is light yet rich, offering a perfect blend of sweetness and chocolatey goodness that both adults and children will adore.
Originating from classic American baking traditions, layer cakes have evolved over the years to include various flavors, fillings, and decorations reflecting just about any occasion. Easter may call for a more festive twist, often adorned in pastel colors, edible decorations like chocolate eggs, or even colorful sprinkles. This cake captures not only the essence of chocolate but also the joy and celebration that comes with sharing food during special family gatherings. The rich chocolate flavor of the cake, combined with the whipped frosting, gives it a delightful texture—moist, fluffy, and indulgently creamy.
This cake is not just about appearance; it’s also about taste, with the chocolate flavor enhanced through quality cocoa powder and pure vanilla extract. Whether you’re a novice looking to impress or an experienced baker wanting to create something special, this cake will suit any skill level of bakers, making it a highlight of your Easter festivities.
Why You’ll Love This
You’re going to love this Easter Chocolate Layer Cake for an array of reasons. First, **the taste** is downright heavenly; imagine biting into soft, fluffy layers of chocolate cake with a luscious, creamy frosting that melts in your mouth. Every forkful brings joy and satisfaction, making it an instant crowd-pleaser.
Moreover, the ease of preparation is another highlight. Even if you’re new to baking, this recipe simplifies the process with clear, concise directions. You don’t have to be a pro to whip up an impressive layer cake that looks and tastes like it came from a bakery. Additionally, the cost is quite reasonable, as many of the ingredients are staples that you may already have in your pantry or are easy to find and purchase.
The versatility of this Easter Chocolate Layer Cake is also a plus! You can easily adapt the flavors or ingredients based on dietary restrictions, such as gluten-free or vegan substitutions. For example, using almond or oat flour instead of all-purpose flour can help those with gluten sensitivities enjoy this delicious dessert too.
Many people struggle with chocolate layer cakes because they fear they will be too dense or dry; however, by following the precise measurements and techniques provided in this recipe, you’ll ensure that your cake turns out just right. Experimenting with variations, such as adding a fruit filling or changing the type of frosting, keeps it exciting and allows you to create a cake tailored to your tastes.
Ingredients You’ll Need
- All-purpose flour: 2 cups — This is the structural base of the cake. You can substitute with gluten-free flour, if needed.
- Cocoa powder: ¾ cup — Use unsweetened cocoa powder for a rich chocolate flavor. Dark cocoa powder can add depth.
- Baking powder: 1 ½ teaspoons — Ensures that the cake rises properly. Always check the expiration date to ensure effectiveness.
- Baking soda: 1 ½ teaspoons — Aids in leavening alongside baking powder. It also enhances the chocolate flavor.
- Salt: ½ teaspoon — Balances the sweetness and enhances the overall flavor of the cake.
- Granulated sugar: 2 cups — This adds sweetness while providing moisture. You can use a sugar substitute if desired.
- Vegetable oil: 1 cup — Keeps the cake moist. You can substitute with melted coconut oil for a lighter flavor.
- Eggs: 4 large — Provides structure and richness to the cake. For a vegan alternative, use flaxseeds or applesauce.
- Vanilla extract: 2 teaspoons — Adds flavor depth; opt for pure vanilla for the best taste.
- Hot water: 1 cup — This helps to dissolve the cocoa and creates a moist cake texture.
- Unsalted butter: 1 cup (for frosting) — For a creamy buttercream that holds well. Salted butter can also be used based on your taste.
- Powdered sugar: 4 cups — Sweetens and thickens the frosting. You can add less if you prefer a less sweet topping.
- Cocoa powder: ½ cup (for frosting) — Enriches the frosting flavor. Adjust based on personal preference.
- Milk or cream: 2-4 tablespoons — Helps to adjust the consistency of the frosting. Use plant-based milk for dairy-free.
How to Make
- Preheat your oven to 350°F (175°C). Grease and flour two 9-inch round cake pans. This step is crucial for preventing the cake from sticking. You can also use parchment paper at the bottom for easier removal.
- In a large mixing bowl, whisk together the flour, cocoa powder, baking powder, baking soda, and salt. This dry mix will ensure an even distribution of all leavening agents and prevent clumping.
- In another bowl, mix the sugar, vegetable oil, and eggs until well combined. The mixture should become smooth and slightly bubbly; this is a sign that the sugar is dissolving, contributing to a moist cake.
- Add the vanilla extract and hot water to the wet mixture. The hot water will make the cocoa bloom, enriching the chocolate flavor. Mix everything until smooth; you want a thin batter, not to worry if it seems runny.
- Gradually add the dry ingredients into the wet mixture, stirring gently with a spatula or wooden spoon. Do not overmix; only blend until there are no dry spots left. Overmixing can lead to a dense cake.
- Pour the batter evenly into the prepared cake pans. Tap gently on your counter to remove any air bubbles; this leads to a more even texture.
- Bake in the preheated oven for 30-35 minutes or until a toothpick inserted into the center comes out clean. Allow the cakes to cool in the pan for about 10 minutes before flipping them onto a wire rack to cool completely.
- For the frosting, beat the butter until creamy. Gradually add in the powdered sugar and cocoa powder, mixing until smooth. Adjust the consistency with milk or cream until you achieve your desired texture. Beat until fluffy and well combined—this step can take several minutes.
- Once the cakes are completely cooled, place one layer on a serving platter. Spread about a cup of frosting evenly over the top, then gently place the second layer on top. Frost the top and sides, using a spatula to smooth out the decoration as desired.
- For a festive touch, consider decorating with seasonal goodies—think chocolate eggs, sprinkles, or fresh fruit. Allow the cake to set for about an hour before cutting into it to give the frosting time to firm up slightly.
Variations & Substitutions
Gluten-Free Easter Chocolate Layer Cake: If you or someone you know is gluten intolerant, you can easily switch out the all-purpose flour for a high-quality gluten-free flour blend. Just make sure to read the ingredients to avoid any hidden gluten sources! You might want to add a bit of xanthan gum, as this can help mimic the structure that gluten provides in traditional baking, ensuring your layers remain fluffy.
Vegan Chocolate Layer Cake: To transform this recipe into a vegan delight, substitute eggs with flaxseed meal (1 tablespoon of flaxseed meal mixed with 3 tablespoons of water equals 1 egg). Use a plant-based milk like almond or oat milk instead of cow’s milk for the frosting. Additionally, replace the butter with a vegan butter substitute. The cake will still be incredibly moist and rich, showcasing the same delightful flavors of chocolate.
Chocolate Mint Layer Cake: For a refreshing twist, you can infuse your frosting with peppermint extract. Simply add ½ teaspoon of peppermint extract to the frosting mixture, and consider garnishing the top with chocolate mint leaves for an elegant touch. This variation is particularly delightful for those who enjoy the combination of chocolate and refreshing mint flavors.
Chocolate Lemon Layer Cake: This variation introduces a surprising yet delightful flavor twist! Simply swap out half of the vanilla extract for lemon juice in the cake batter. This would create a chocolate cake with a refreshing citrus flavor that cuts through the richness, making it a unique and memorable option for your Easter table.
Common Mistakes to Avoid
One common mistake when baking is **not preheating the oven**. This can lead to uneven baking and altered textures, resulting in a cake that does not rise as expected. Make sure to allow your oven sufficient time to heat up before placing your cakes inside.
Another thing to be cautious of is overmixing your batter. **Overmixing can lead to a dense cake** because it develops the gluten in the flour. Mix just until the ingredients are combined, and avoid the temptation to continue beyond that point.
Also, remember to allow your cakes to cool completely before frosting them. **If they are still warm, the frosting can melt and slide off**, leading to a messy presentation. Patience during the cooling phase will ensure a beautiful final product that you can proudly present.
Lastly, choose your decorations wisely. **Avoid utilizing heavy decorations**, as they can cause the frosting to slide off the cake. Instead, if you’re relying on heavier items, consider lightly pressing them into the frosting to ensure they stick without disrupting your beautiful layers.
Storage, Freezing & Reheating Tips
Proper storage of your Easter Chocolate Layer Cake is essential to maintaining its freshness. First, make sure it has cooled completely after baking before wrapping it. You can keep it covered at room temperature for up to three days. If your kitchen is particularly warm, consider refrigerating it to prolong freshness.
For longer storage, your cake can be frozen. **Wrap it tightly** in plastic wrap, then in aluminum foil, and place it in the freezer. It is advisable to consume the frozen cake within three months for the best quality. When ready to serve, thaw it in the refrigerator overnight for gradual warming before bringing it to room temperature or serving it directly.
If you have leftover slices after your gathering, place them in an airtight container. For best results, consume the slices within a week. When reheating, if serving warmed cake is desired, place a slice in the microwave for about 10-15 seconds. Be careful not to overheat, as this can cause the frosting to melt excessively.
Frequently Asked Questions
Can I make this cake ahead of time? Yes! This Easter Chocolate Layer Cake can be baked in advance and stored. Simply wrap the cooled layers tightly in plastic wrap and refrigerate or freeze them. If frozen, allow them to thaw in the refrigerator overnight before frosting and serving.
Can I use a different frosting than chocolate buttercream? Absolutely! While chocolate buttercream pairs beautifully with this cake, you can opt for a classic vanilla buttercream, cream cheese frosting, or even a ganache topping for a fun twist.
How do I adjust the sweetness of the cake or frosting? If you find the cake or frosting too sweet for your taste, start by gradually reducing the amount of sugar as you mix. It’s easier to add a little more sugar later if needed, but harder to fix an overly sweet cake.
What if my cake sinks in the middle? A sinking cake often results from underbaking or opening the oven too early during baking. Always check for doneness with a toothpick to ensure it is fully baked before removing it from the oven.
Can I add fillings between the layers? Definitely! Feel free to add layers of fruit preserves, whipped cream, or even a rich chocolate ganache in between the cake layers. Just ensure they are thick enough to withstand the layers without leaking out.
Conclusion:
The Easter Chocolate Layer Cake is not just dessert; it is a celebration of flavor, family, and festivity! With its rich chocolate flavor and intricate layers, this cake is sure to impress your family and friends, becoming a beloved tradition for many Easters to come. Don’t hesitate to try variations that highlight your unique taste and share this cake with loved ones. Whether you’re a beginner or a seasoned baker, I encourage you to dive into this recipe and let the delightful aroma fill your home. Happy baking!