Prep time: 20 minutes
Cook time: 25 minutes
Total time: 45 minutes
Servings: 12
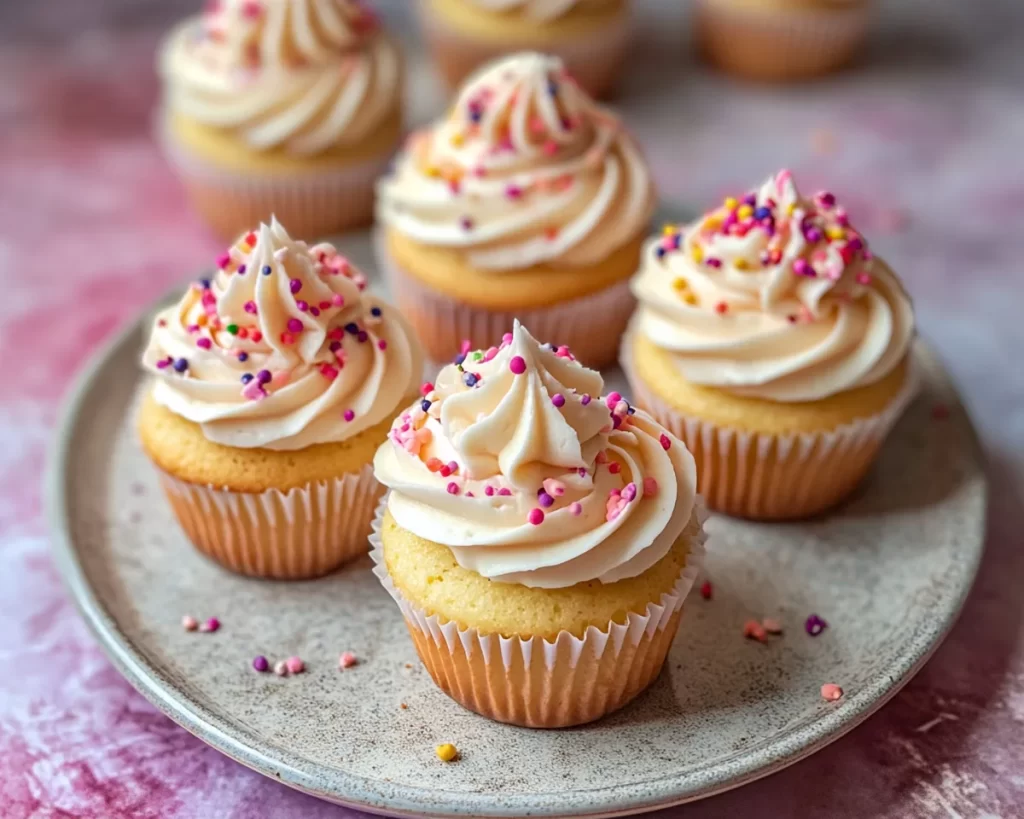
There’s something nostalgic about the aroma of freshly baked vanilla cupcakes wafting through your home. It immediately evokes feelings of warmth and love, often tied to special occasions or celebrations. Perhaps you remember baking with your mother on a rainy afternoon, or maybe you are a busy parent trying to make sweet memories with your own children. No matter your background, these Mother’s Day Vanilla Cupcakes with Buttercream are sure to make your loved ones feel cherished. In this recipe, you will learn how to create delightful cupcakes with a fluffy texture and rich, creamy frosting that will impress everyone around your table.
These cupcakes stand out with their light, airy sponge and the luscious, buttery frosting. What makes this recipe a must-try is not just the flavor but also how straightforward it is, even for kitchen novices. You’ll find plenty of helpful tips and variations to ensure your baking experience is seamless, making these cupcakes the ideal choice whether you are celebrating Mother’s Day or simply indulging in a sweet treat.
What Is Mother’s Day Vanilla Cupcakes with Buttercream?
Mother’s Day Vanilla Cupcakes with Buttercream are not just a dessert; they are a heartfelt gesture. Originating from classic cupcake recipes, these treats are typically soft, moist, and fluffy. Imagine taking a bite and discovering a rich vanilla flavor that perfectly complements the sweet, creamy buttercream frosting on top. The combination creates a delightful balance of sweetness and texture that will make your taste buds dance.
In terms of texture, these cupcakes have a light crumb that melts in your mouth, while the buttercream sits atop like a soft, velvety cloud. What truly sets this vanilla cupcake apart is its unmistakable, fragrant vanilla essence that can elevate any occasion, particularly Mother’s Day. Whether you’re a beginner or a seasoned baker, creating these cupcakes from scratch is a rewarding experience that is sure to bring smiles to faces young and old.
Why You’ll Love This
You’ll love these cupcakes for many reasons. First and foremost, the taste is unbeatable. The vanilla flavor is rich and comforting, making them an ideal treat for kids and adults alike. The ease of preparation is another reason why this recipe shines. With simple ingredients and straightforward steps, you’ll be able to whip up these delightful cupcakes in no time. Perfect for busy parents or beginner bakers, this recipe is a foolproof way to create something delicious.
Moreover, the cost of making these cupcakes is budget-friendly. Most of the ingredients are common pantry staples, and there’s no need for extravagant purchases. Lastly, their versatility allows you to customize them to meet various dietary needs and preferences. You can add sprinkles for a fun twist, switch out the vanilla for other flavors, or even create themed decorations that will make these cupcakes the star of your event.
Ingredients You’ll Need
- All-purpose flour: This is the base of your cupcakes. It provides structure. If needed, you can substitute with a gluten-free flour blend for a gluten-free option.
- Sugar: Granulated sugar adds sweetness and contributes to the lightness of the cupcake. Brown sugar can be used for a deeper flavor.
- Baking powder: This helps the cupcakes rise. Ensure it’s fresh for the best results.
- Salt: A pinch of salt enhances the flavors and balances the sweetness.
- Eggs: Eggs help bind the ingredients together and add moisture. You can use flax eggs as a vegan substitute.
- Milk: Milk adds moisture and flavor. Dairy-free alternatives such as almond or oat milk work well.
- Butter: Unsalted butter creates a rich flavor in the cupcakes. You can replace it with margarine for a dairy-free option.
- Vanilla extract: This key ingredient imparts that classic vanilla flavor. Pure vanilla extract is best, but imitation can be used in a pinch.
How to Make
- Preheat your oven: Start by preheating your oven to 350°F (175°C). This ensures that your cupcakes rise perfectly. Prepare a standard cupcake tin by lining it with paper cupcake liners.
- Mix dry ingredients: In a medium bowl, whisk together the all-purpose flour, sugar, baking powder, and salt. This step is crucial for ensuring that the leavening agents are evenly distributed throughout the flour.
- Cream butter and sugar: In a large bowl, beat the butter until it is creamy. Gradually add the sugar and continue to mix until the mixture is light and fluffy. This usually takes around 3-5 minutes, and the texture should be airy.
- Add eggs and vanilla: Add the eggs, one at a time, mixing well after each addition. Then, pour in the vanilla extract. The mixture will become softer and more cohesive during this step.
- Combine wet and dry ingredients: Alternate adding the dry mixture and the milk to the butter mixture. Start with half of the dry ingredients, then add half of the milk, and continue this pattern until all ingredients are combined. Be careful not to overmix; stop as soon as you no longer see dry flour.
- Fill the cupcake liners: Using a scoop or spoon, evenly distribute the batter into the prepared cupcake liners, filling them about two-thirds full. This ensures that they have enough room to rise without overflowing.
- Bake: Place the cupcake pan in the preheated oven and bake for about 20-25 minutes, or until a toothpick inserted into the center comes out clean. You’ll know they’re ready when they spring back slightly when touched.
- Cool: Once baked, remove the cupcakes from the oven and let them cool in the pan for 5 minutes before transferring them to a wire rack. Allow them to cool completely before frosting.
- Prepare buttercream frosting: To make the buttercream, beat together the softened butter and powdered sugar until light and fluffy. Add vanilla and a splash of milk as needed for desired consistency. You want it creamy yet spreadable.
- Frost the cupcakes: Once cooled, frost the cupcakes generously with the buttercream using a knife or piping bag. Feel free to get creative with sprinkles or decorations!
Variations & Substitutions
Chocolate Vanilla Cupcakes: By substituting part of the all-purpose flour with unsweetened cocoa powder, you can create a delightful twist on the classic vanilla flavor. These chocolate variations are perfect for chocolate lovers and add an exciting dimension to an otherwise traditional cupcake. Just be mindful that the baking time may differ slightly, so keep an eye on them as they bake.
Gluten-Free Vanilla Cupcakes: If you or your guests are gluten-sensitive, you can easily make gluten-free vanilla cupcakes by using a gluten-free flour blend. Ensure that it includes a binding agent like xanthan gum for the best structure. The flavor and texture can still be light and fluffy, making it a great alternative without compromising taste.
Dairy-Free Vanilla Cupcakes: These can be made dairy-free by replacing the butter with coconut oil or vegan butter and using plant-based milk. The result is still delicious, and perfect for those who are lactose intolerant or choose a vegan lifestyle.
Mini Vanilla Cupcakes: For bite-sized treats, consider making mini cupcakes instead. Simply reduce the baking time to about 10-15 minutes and keep an eye on them to avoid overbaking. These little delights are great for parties and are sure to be a hit among guests of all ages.
Fruit-Infused Vanilla Cupcakes: Adding fresh fruit purees or zest, such as lemon or orange, can elevate the flavor profile of your cupcakes. Incorporate about 1/4 cup of fruit puree into the batter to create a refreshing and flavorful addition that brightens the cupcake experience.
Common Mistakes to Avoid
One common mistake in baking cupcakes is overmixing the batter. When you overmix, the gluten in the flour develops too much, leading to dense cupcakes instead of the light, fluffy texture you desire. Make sure to mix until just combined, as some lumps are perfectly fine.
Another potential issue arises from underbaking or overbaking. It’s essential to watch your cupcakes closely in the last few minutes of baking. If you pull them out too early, they will collapse as they cool. Conversely, leaving them in the oven too long can lead to dry, crumbly cupcakes. A toothpick inserted into the center should come out clean or with a few moist crumbs for the perfect doneness.
Also, using cold ingredients can lead to uneven blending. It’s best to have your butter and eggs at room temperature before you start mixing. This will ensure a consistent texture and improve the cupcakes’ structure.
Storage, Freezing & Reheating Tips
To store your cooled Mother’s Day Vanilla Cupcakes, place them in an airtight container at room temperature. They can remain fresh for about 3 days. If you’re frosting them, it’s best to keep them refrigerated, but they will keep better at room temperature without frosting.
For long-term storage, consider freezing them. Wrap each cupcake individually in plastic wrap and place them in a freezer-safe ziplock bag. They can last up to 3 months in the freezer. When you’re ready to enjoy one, simply remove it from the freezer and let it thaw at room temperature for about 1 hour before frosting.
Avoid refreezing thawed cupcakes to maintain their texture. For reheating, should the cupcakes be slightly firm after freezing, pop them in the microwave for about 10-15 seconds to gently warm them up. This is especially great if you want to enjoy them alongside a scoop of vanilla ice cream!
Frequently Asked Questions
Can I use a different flavor extract instead of vanilla? Yes! While vanilla is the classic choice, you can experiment with other extracts like almond or lemon for a unique flavor twist. Consider using pure extracts for the best results, as they tend to offer more robust flavors.
What types of decorations work well with these cupcakes? You can get creative with your cupcake decorations. Sprinkles, edible glitter, or even fresh fruit can elevate their appearance. For a more sophisticated look, consider using fondant decorations or chocolate curls.
Can I make the cupcakes ahead of time? Absolutely! You can bake the cupcakes a day or two prior to your event and store them as described above. This can help you save time on the day of your celebration, allowing you to focus on other preparations.
How do I know when my cupcakes are done baking? The best way to check for doneness is by using a toothpick. Insert it into the center of one of the cupcakes; if it comes out clean or with just a few moist crumbs, they are ready to be taken out of the oven.
What should I do if my cupcakes sink in the middle? Cupcakes sinking often indicate that they were underbaked or that too much leavening agent was used. Always measure ingredients carefully and ensure your oven is at the correct temperature. If they sink, they could still be delicious; use them for a trifle or as a base for a parfait!
Conclusion:
These Mother’s Day Vanilla Cupcakes with Buttercream are not only easy to make but their delightful flavor profile brings warmth and joy to any occasion. With their fluffy texture and rich frosting, they will surely make your loved ones feel special. Don’t hesitate to put your spin on this recipe or share it with friends and family. Remember, baking is all about creating memories, so get your loved ones involved and make this special day even more memorable! Try it out, customize to your liking, and spread the joy one cupcake at a time!
[Read also: Easy Dessert Recipes for Beginners]