Prep time: 20 minutes
Cook time: 45 minutes
Total time: 1 hour 5 minutes
Servings: 12
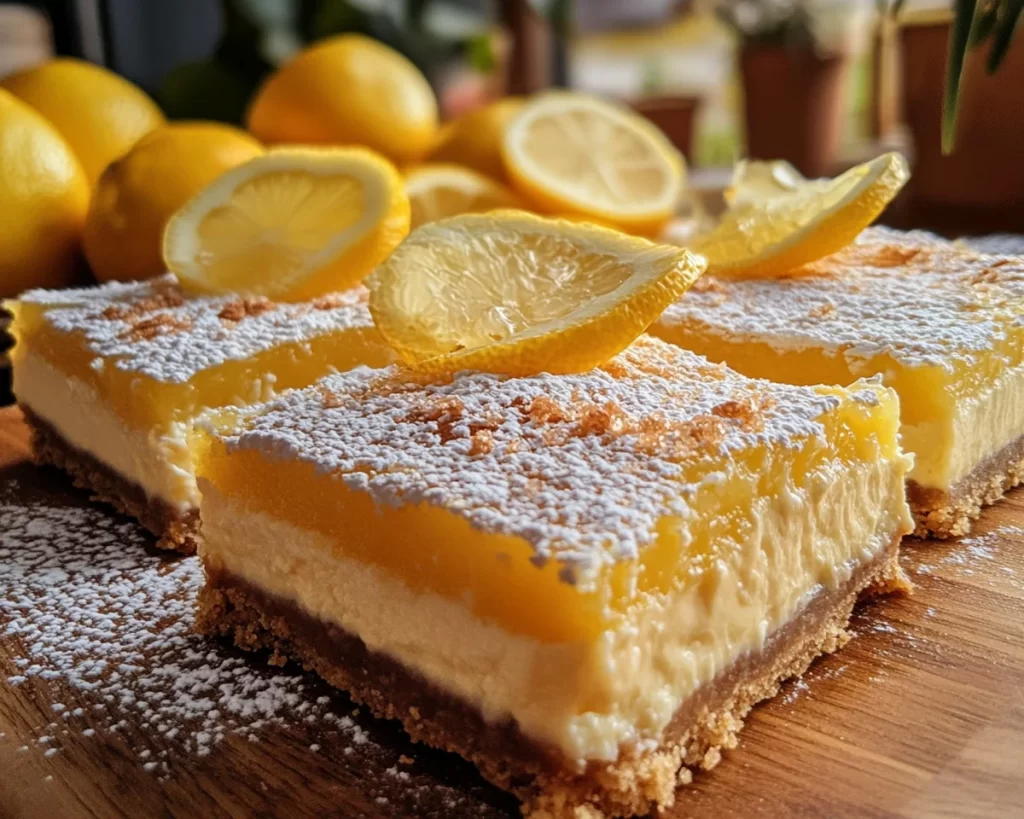
Imagine biting into a creamy, tangy bar that brings the essence of spring to your palate. That’s exactly what you’ll experience with these delightful Easter Lemon Cheesecake Bars. Inspired by traditional cheesecake, these bars offer a zesty lemon flavor that balances perfectly with the creamy texture of the cheesecake filling. Whether served as a festive dessert or as a delightful afternoon treat with tea, they are bound to impress your family and friends.
What makes this recipe special is not just the vibrant flavor but also its simplicity. You don’t need to be a professional baker to create this delicious dessert. With just a handful of ingredients, you’ll have a beautiful dish that’s both easy to prepare and utterly satisfying. In the following sections, you’ll learn how to make these bars, explore their delightful variations, and avoid common pitfalls. Get ready to indulge in a truly wonderful dessert that embodies the spirit of Easter and spring!
What Is Easter Lemon Cheesecake Bars?
Easter Lemon Cheesecake Bars are an innovative twist on the classic cheesecake, designed to celebrate the joyous occasion of Easter. By incorporating fresh lemon juice and zest, these bars exude a vibrant flavor profile that evokes the spirit of spring. The creamy filling is nestled on top of a buttery graham cracker crust, making each bar a symphony of textures and tastes. The origin of cheesecake can be traced back to ancient Greece, but this modern interpretation incorporates seasonal ingredients to create a dish that feels refreshingly contemporary.
The texture of lemon cheesecake bars is one of their most appealing characteristics. You have the crumbly, slightly sweet crust contrasting beautifully with the smooth and velvety filling. Once baked, they achieve a slight jiggle, which indicates that they are perfectly set. The richness of cream cheese harmonizes with the brightness of the lemon, creating a balance that is both indulgent and light. It’s a dessert that embodies a celebration of flavors, making it an ideal centerpiece for your Easter table.
Why You’ll Love This
One of the primary reasons you’ll love these Easter Lemon Cheesecake Bars is their delightful **taste**. The zesty lemon brings a refreshing zing that brightens the palate, making these bars perfect for celebrations. Their ease of preparation is another significant advantage; even those who are new to baking will find this recipe approachable. With minimal cooking time, you can spend less time in the kitchen and more time making memories with loved ones.
Furthermore, these bars are cost-effective. Most of the ingredients are pantry staples that you might already have on hand, making it easier to whip them up on a whim. Unlike many elaborate desserts, this cheesecake bar recipe doesn’t require fancy equipment or extensive techniques, dispelling the myth that impressive desserts are out of reach for the average home cook. Additionally, they are versatile—perfect for Easter gatherings, brunches, or even a cozy evening at home.
Ingredients You’ll Need
- Graham cracker crumbs: These form the base for your cheesecake bars. If you want a gluten-free option, look for gluten-free graham crackers, or consider using ground oats.
- Granulated sugar: This sweetens both the crust and the filling, helping to balance the acidity of the lemon.
- Unsalted butter: Butter binds the crust together and adds richness. You can use coconut oil as a lactose-free substitute.
- Cream cheese: Essential for creating a smooth and rich filling. Ensure it’s softened for easier blending.
- Sour cream: This adds a creamy tanginess that enhances the overall flavor.
- Fresh lemon juice: The star of the show! Freshly squeezed lemon juice brings brightness and zest.
- Lemon zest: This adds concentrated lemon flavor and aromatic oils that elevate the cheesecake experience.
- Vanilla extract: Adds a warm, sweet depth of flavor that complements the lemon.
- Eggs: Eggs provide structure to the filling and help bind the ingredients together.
Each ingredient plays a crucial role in building the flavors and textures of the cheesecake bars. Whether you opt for traditional substitutions or experiment with non-traditional options, the base remains delightfully lemony and creamy.
How to Make
- Preheat your oven to 325°F (160°C). This step is crucial; preheating ensures that your cheesecake bars bake evenly. While the oven warms up, prepare your baking dish by lining it with parchment paper, allowing for easier removal later.
- In a mixing bowl, combine the graham cracker crumbs, granulated sugar, and melted unsalted butter. Mix until the crumbs resemble wet sand. This mixture should hold together when squeezed in your hand; if it doesn’t, you may need to add a little more melted butter.
- Press the graham cracker mixture firmly into the bottom of the prepared baking dish. Use the back of a measuring cup to create an even layer. Making sure it’s tightly packed will ensure that the crust holds together once baked.
- Bake the crust in the preheated oven for 10 minutes. This helps to firm it up and adds a lovely toasted flavor. The aroma of baking graham crackers will waft through your kitchen, setting the stage for the cheesecake filling.
- While the crust cools, prepare the cheesecake filling. In a mixing bowl, beat together the softened cream cheese and sour cream until smooth and creamy. Scrape down the sides of the bowl to ensure everything is well-blended. The filling should be luscious and free of lumps.
- Add the fresh lemon juice, lemon zest, and vanilla extract to the cream cheese mixture. Beat until everything is thoroughly incorporated. Taste the mixture; it should be pleasantly tart and sweet, just like spring.
- In a separate bowl, whisk the eggs until they are light and frothy, then gradually add them to the cream cheese mixture. This helps to avoid a curdled texture. Mix until just combined; overmixing can lead to cracks in your baked cheesecake.
- Pour the filling over the pre-baked crust and spread it evenly using a spatula. The filling should be smooth and light in color, inviting you to take that first bite.
- Bake the cheesecake bars for approximately 30–35 minutes. The sides should be set, while the center remains slightly jiggly; it will firm up as it cools. Once baked, the edges will be lightly golden, and a delightful aroma will fill your kitchen.
- Allow the bars to cool at room temperature for about 1 hour before refrigerating for at least 3 hours. This cooling period helps the flavors to meld together, creating a harmonious dessert. For the best results, leave them to chill overnight in the refrigerator.
- Once fully chilled, lift the cheesecake out of the pan using the parchment paper and cut into squares. Serve chilled, and enjoy the burst of lemon flavor with each bite!
Variations & Substitutions
Fruit Topping Variation: One delightful way to elevate the Easter Lemon Cheesecake Bars is by adding fresh fruit on top, such as mixed berries or sliced strawberries. This not only adds a pop of color but also introduces additional layers of flavor. The tartness of the berries beautifully contrasts with the sweet and creamy cheesecake, enhancing your dessert experience. To prepare, simply wash and slice your desired fruits and arrange them on top of the chilled cheesecake before serving.
Chocolate Swirl Variation: If you adore chocolate, consider creating a chocolate swirl version. Melt some dark or semi-sweet chocolate and drizzle it over the lemon filling right before baking. Use a knife to swirl the chocolate through the batter for stunning visual appeal and a rich taste. This variation offers a delightful contrast to the lemon’s tartness, appealing to chocolate lovers. It’s a fantastic way to surprise guests who may be expecting the traditional flavor profile.
Gluten-Free Variation: For those avoiding gluten, you can easily adjust the recipe by using gluten-free graham cracker crumbs or almond flour for the crust. This variation ensures that everyone can indulge without feeling left out. Additionally, double-check all other ingredients for gluten-free labels to ensure safety and accommodate dietary restrictions. The texture may differ slightly but will still yield a deliciously creamy bar.
No-Bake Variation: If you’re looking for a simpler approach, consider making these as no-bake cheesecake bars! Instead of baking the filling, simply freeze it for several hours after adding it to the crust. This method results in a denser, creamier texture that many find irresistible. However, don’t skip the chilling process as it allows the flavors to meld beautifully. Serve with a sweetened whipped cream topping for an extra touch of elegance.
Vegan Variation: For a plant-based option, substitute traditional dairy ingredients with vegan alternatives. Use coconut cream in place of cream cheese and silken tofu mixed with lemon juice as a replacement for eggs. Maple syrup can sweeten the filling while keeping it vegan-friendly. This variation retains the tangy lemon flavor while meeting the needs of those following a vegan diet.
Common Mistakes to Avoid
One common mistake in making cheesecake bars is overmixing the filling. Overbeating can incorporate too much air, leading to cracks during baking. To avoid this, mix just until smooth without overworking it. Another mistake is not letting the cheesecake cool completely before refrigerating. This can lead to a soggy texture or cause the bars to split. Always allow the cheesecake to set at room temperature first.
A further issue could be using cold cream cheese. Always ensure the cream cheese is at room temperature to achieve a smooth filling. Cold cream cheese results in lumps that are difficult to blend out. Finally, ensure you use a sharp knife when cutting the chilled bars; a hot knife dipped in water can help create clean edges, providing an aesthetically pleasing presentation.
Storage, Freezing & Reheating Tips
To store your Easter Lemon Cheesecake Bars, wrap them tightly in plastic wrap or place them in an airtight container. They can be kept in the refrigerator for up to one week. For long-term storage, these bars freeze beautifully. Simply cut them into squares, wrap individually in plastic wrap, and place them in a freezer-safe container. They will stay fresh for up to three months.
When you’re ready to enjoy a piece, remove the bars from the freezer and let them thaw in the refrigerator for a few hours. Avoid reheating them in the microwave, as this can alter the texture. Instead, enjoy them chilled as a delightful treat on a warm day or after a hearty meal.
Frequently Asked Questions
Can I use bottled lemon juice instead of fresh? Absolutely, while fresh lemon juice is always recommended for its superior flavor, bottled lemon juice can be a convenient substitute. However, be aware that the taste might not be as vibrant. Always choose a high-quality bottled lemon juice for the best results.
How do I know when my cheesecake bars are done? The best way to test for doneness is by lightly shaking the baking dish. The edges should be set while the center remains slightly jiggly. It will continue to firm up as it cools, giving you that creamy texture you desire.
Can I use a different type of crust? Yes! While a graham cracker crust is traditional, you can experiment with various options. Use digestive biscuits, crushed cookies, or even a chocolate cookie crust for a unique flavor twist.
How long do these cheesecake bars take to set after baking? After removing the cheesecake bars from the oven, allow them to cool at room temperature for about an hour. Following that, they should chill in the refrigerator for at least three hours, although overnight is ideal for the best texture and flavor.
Can I double the recipe? Definitely! If you want to make a larger batch, simply double the ingredients and use a larger baking dish. Just be sure to adjust the baking time, checking for doneness periodically as it may take a little longer to set.
Conclusion:
In summary, these Easter Lemon Cheesecake Bars are an exceptional treat that embodies the freshness and vibrancy of springtime. With a creamy texture and a delightful lemon punch, they are sure to impress both family and friends. You have the flexibility to customize them with various toppings and variations, making this dessert even more special. Don’t hesitate to experiment and make the recipe your own. Try it out, share your experience, and indulge in this delightful Easter dessert!