Prep time: 10 minutes
Cook time: 20 minutes
Total time: 30 minutes
Servings: 4
Are you ready to dive into a delightful culinary experience that can transform your brunch table? Imagine biting into a warm, fluffy mini Dutch baby, its edges crisped to perfection, with pockets of gooey cheese and savory ham. This dish fuses the classic Dutch baby pancake with modern savory twists, creating a dish that will leave your guests raving and asking for seconds. You’ll master the art of making these delightful treats with ease, ensuring that every inch—crispy outer crust and custardy inner texture—celebrates the harmony of flavors.
In this article, you will discover the essence of mini Dutch babies, learn about the essential ingredients, and follow a step-by-step guide to create your own mouthwatering batch. Along the way, we’ll share helpful tips, variations to cater to dietary preferences, and answers to frequently asked questions that will guarantee your success in the kitchen. Get ready to impress yourself and others with this delicious recipe that harmonizes taste, texture, and satisfaction.
What Is Can You Make Perfect Mini Dutch Babies With Ham and Cheese?
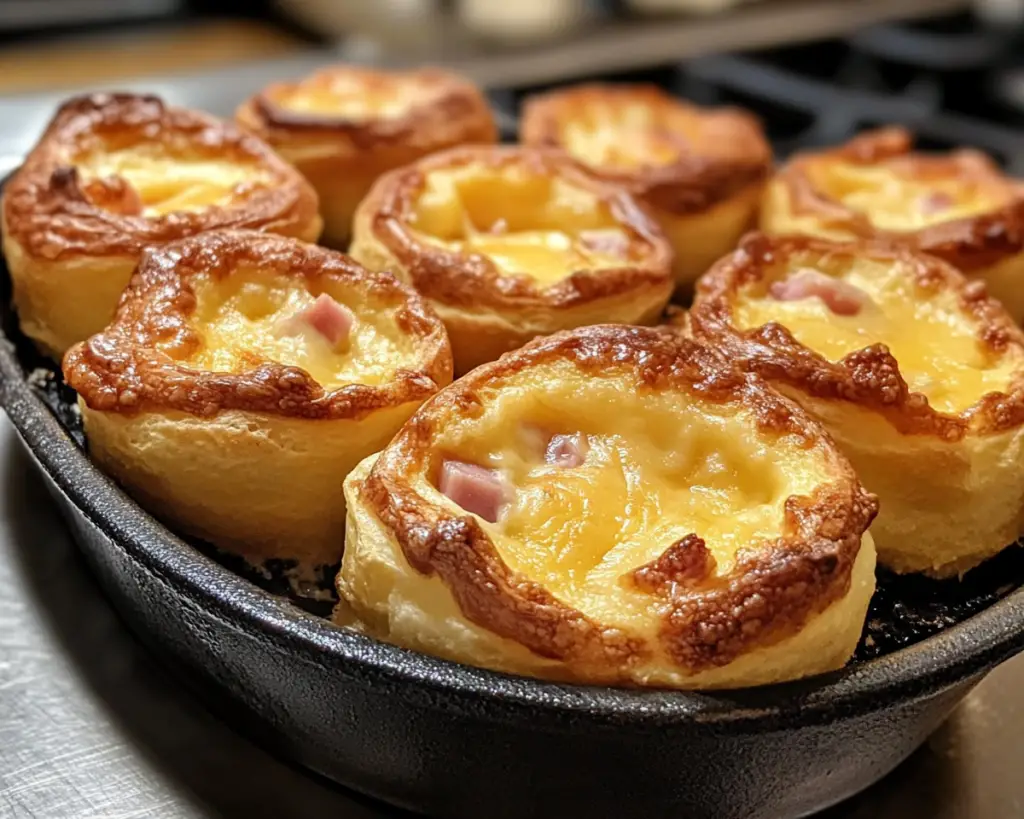
The mini Dutch baby, often hailed as the perfect brunch item, has origins that trace back to Germany, where it was known as a “Dutch puff.” This delightful dish is characterized by its airy, soufflé-like texture. When baked, mini Dutch babies puff up dramatically, forming a golden shell that cradles whatever filling you choose. In this recipe, we explore the savory side by using ham and cheese to create a layered flavor profile that is both comforting and satisfying.
These mini versions make serving and sharing a breeze, perfect for gatherings with family and friends. There’s something nostalgic about the warm aroma that wafts from the oven while they cook, reminiscent of lazy Sunday mornings with loved ones. The dish’s versatility allows it to be enjoyed any time of day, whether for breakfast, brunch, or even a light dinner option. The contrast of the fluffy interior paired with the crispy edges elevates the eating experience, ensuring that each bite is bursting with flavor.
Why You’ll Love This
Let’s get down to why this recipe is a must-have in your culinary repertoire. First off, the flavor combination of ham and cheese is a classic that never gets old, offering a satisfying, savory experience packed with protein. You’ll love how quick and straightforward this recipe is—perfect for busy parents or beginners in the kitchen. The result is a gourmet-sounding dish that requires minimal ingredients and can often be made with whatever is left in your fridge.
Moreover, the ingredients are often low-cost, making it a budget-friendly choice for families. You can also adapt these mini Dutch babies for various dietary preferences. For instance, swapping out traditional dairy with vegan cheese or ham alternatives allows you to create a dish that accommodates different eating lifestyles without compromising the flavor. Don’t be worried about making mistakes; even if the first batch (or two) isn’t perfect, you’ll find a method that works best for you, leading to continually improving your cooking skills.
Ingredients You’ll Need
- Eggs (4 large): Eggs play a crucial role in providing the fluffy structure of the Dutch baby. You can substitute with egg alternatives for a vegan version, but the texture will differ.
- Milk (1 cup): Whole milk yields richer and creamier results, but you can swap it with any plant-based milk for dairy-free options.
- All-purpose flour (1 cup): This ingredient serves as the base for the batter. For a gluten-free version, consider using almond or gluten-free baking flour.
- Salt (a pinch): A small amount enhances the other flavors in the dish.
- Ham (1 cup, diced): Choose your favorite smoked or deli ham. You could also opt for turkey ham or a vegetarian substitute.
- Cheese (1 cup, shredded): Common choices include cheddar, gouda, or even a spicy pepper jack for an extra kick. Non-dairy cheese options are also available.
- Butter (4 tablespoons): This adds richness and flavor. Make sure to adjust the amount if you prefer a lighter version.
Each ingredient contributes not only to the flavor but also to achieving that memorable texture that makes mini Dutch babies so irresistible.
How to Make
- Prepare the oven and skillet: Preheat your oven to 425°F (220°C). While it’s heating up, place a cast-iron skillet or oven-proof pan into the oven. This step is vital because a hot skillet promotes that beautiful puffiness in the batter.
- Mix the wet ingredients: In a mixing bowl, whisk together the eggs, milk, and a pinch of salt until well blended. The mixture should be slightly frothy, which helps incorporate air for a light texture.
- Add the flour: Gradually incorporate the flour into the wet mixture while whisking continuously. Ensure there are no lumps to create a smooth batter. When finished, the consistency should be reminiscent of a thick pancake batter.
- Combine ham and cheese: Fold in the diced ham and shredded cheese into the batter. This will allow the flavors to meld together while the Dutch baby bakes.
- Add butter to the skillet: Carefully take the hot skillet out of the oven (be cautious as it will be extremely hot!) and add the butter. Swirl it around until it melts and coats the bottom and sides of the skillet.
- Pour the batter into the skillet: Immediately pour the batter over the melted butter. Place the skillet back into the oven right away. This is crucial for the Dutch baby’s rise.
- Bake to perfection: Bake for about 18-20 minutes, or until the edges puff up and are a striking golden brown. Avoid opening the oven door during the baking process; you want to maintain that steam that helps create the perfect puff.
- Serve immediately: Once finished, remove the skillet from the oven. Let it cool slightly before slicing into wedges for serving. Enjoy your mini Dutch babies warm, optionally garnished with fresh herbs or a sprinkle of extra cheese on top.
Each step adds to the buildup of flavor and texture, ensuring that when you serve these delightful mini Dutch babies, everyone will be excited to dig in!
Variations & Substitutions
Vegetarian Option: If you want to cater to a vegetarian crowd, consider swapping out the ham for sautéed mushrooms or spinach. This adds earthy flavors that balance the dish beautifully. For extra flavor, incorporating sun-dried tomatoes can introduce a lovely tanginess.
Spicy Cheese Variation: For a heat-loving crowd, replace regular cheese with a spicy pepper jack variety. The added spice brings a new level of excitement to the dish. Consider also adding jalapeños or crushed red pepper flakes to the batter if you love that extra kick.
Herbed Dutch Babies: Infusing fresh herbs into the batter elevates your mini Dutch babies to gourmet status. Adding finely chopped chives, parsley, or even rosemary can infuse the dish with a fresh, aromatic quality. This variation pairs perfectly with a side of herb-infused crème fraîche.
Sweet Variation: Though we’re focusing on savory, consider a sweet twist by eliminating the ham and cheese altogether. Instead, incorporate fruits such as blueberries or cherries and sprinkle with powdered sugar and a drizzle of maple syrup. This makes for a delightful dessert option!
Common Mistakes to Avoid
One common mistake when making mini Dutch babies is not preheating the skillet adequately. A properly heated skillet is crucial for achieving that beautiful puff. If you find your Dutch babies come out flat, check your oven’s temperature as well; baking at sub-optimal temperatures leads to flat results.
Another pitfall is overmixing the batter. While it’s essential to combine the ingredients, overmixing can lead to dense, gummy texture in your finished dish. When incorporating the flour, mix just until blended and free of lumps.
Lastly, be mindful of steam when baking. As tempting as it may be to peek in on the progress, opening the oven door can let steam escape, negatively affecting the puffing process. For perfect results, just be patient and allow the magic to happen behind closed doors until the timer goes off!
Storage, Freezing & Reheating Tips
For optimal freshness, mini Dutch babies are best served immediately after baking. However, if you have leftovers, store them in an airtight container in the refrigerator for up to two days. Reheat them in the oven at a low temperature until warmed through to restore their original texture.
If you want to make batches ahead of time, consider freezing them. Once baked and cooled, place them in a single layer on a baking sheet before freezing. After frozen, transfer them to an airtight freezer bag where they can stay fresh for up to two months. To reheat, simply bake from frozen at 350°F (175°C) until heated through.
Remember to adhere to food safety standards, especially regarding storing leftovers. Always ensure that the dish has cooled completely before sealing it to prevent moisture buildup that can lead to spoilage.
Frequently Asked Questions
Can I make mini Dutch babies ahead of time?
Yes, you can prepare the batter a few hours in advance and keep it in the refrigerator. However, it’s best to cook them fresh to retain that puffiness and texture.
Are mini Dutch babies gluten-free?
You can make them gluten-free by substituting the all-purpose flour with a gluten-free flour blend. Keep in mind that alterations may slightly change the final texture, so using a blend designed for baking is recommended.
Can I use almond milk instead of regular milk?
Absolutely! Almond milk or any plant-based milk works well in this recipe, but choose unsweetened varieties for a more balanced flavor.
What can I serve with mini Dutch babies?
Mini Dutch babies can be enjoyed with a variety of sides. Fresh fruit, whipped cream, or even a light mixed salad can complement them perfectly, depending on whether you’re going savory or sweet.
How do I prevent my Dutch baby from deflating once it’s out of the oven?
Euro-style Dutch babies are known to deflate when removed from a hot oven. To keep them looking puffed as long as possible, serve them immediately after baking. If you do need to hold them, try keeping them warm in a low oven, covered loosely with aluminum foil.
Conclusion:
In summary, crafting perfect mini Dutch babies with ham and cheese is a guaranteed route to culinary delight that easily fits into any schedule or budget. With a few simple ingredients and a handful of straightforward steps, you’ll treat your taste buds to something truly special. So why not give it a shot? Customize it to your liking, invite friends or family over, and enjoy the warm, savory aroma filling your home. Don’t forget to share this delightful recipe and spread the joy of cooking with others! Happy baking!