Prep time: 15 mins
Cook time: 30 mins
Total time: 45 mins
Servings: 12
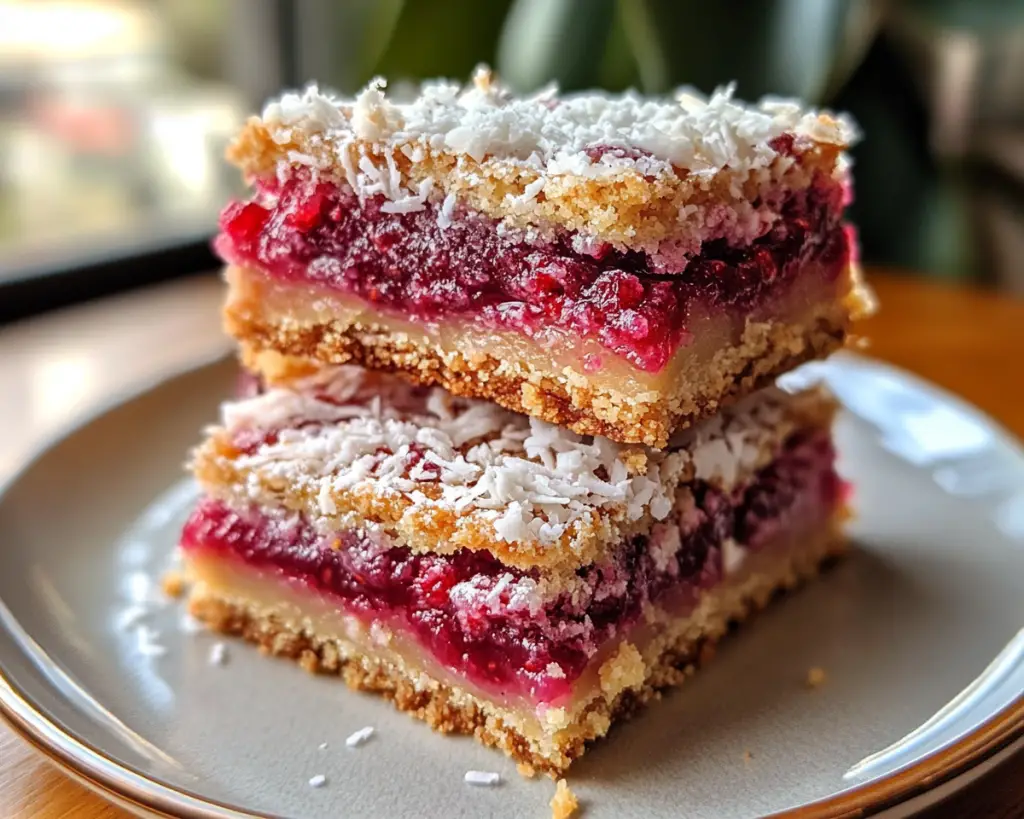
Spring is in the air, and nothing brings that uplifting sense of renewal quite like a pan of freshly baked Raspberry Coconut Magic Bars. This delightful treat combines the tangy sweetness of raspberries with the tropical flair of coconut, creating a dessert that not only tantalizes your taste buds but also brightens up your table. Whether you’re hosting a gathering or simply looking for a sweet pick-me-up, these bars are sure to impress and satisfy.
What makes this Raspberry Coconut Magic Bars Recipe truly special is its effortless blend of ingredients and flavors. With just a handful of pantry staples, you can create a dessert that looks and tastes gourmet. Plus, the combination of textures—the chewy coconut, the tart raspberries, and the buttery crust—makes each bite utterly irresistible. In this article, you will learn how to make these magic bars, tips for variations, common mistakes to watch out for, and more.
What Is Raspberry Coconut Magic Bars Recipe – Easy Spring Dessert Ideas?
Raspberry Coconut Magic Bars are a delightful dessert that originated from the classic “magic bars,” known for their layers of rich flavors and textures. Typically, these bars are made with a graham cracker crust, and the addition of coconut and chocolate has made them a staple in many households. This particular version adds a fruity twist with raspberries, creating a delightful contrast between the sweet and tangy notes.
The essence of these bars lies in their versatility. The buttery crust serves as a perfect base for the gooey and slightly chewy topping, which is packed with shredded coconut, sweetened condensed milk, and, of course, luscious raspberries. You can expect a burst of berry flavor with every bite, combined with the tropical richness of coconut. Both flavors not only complement each other but also provide a vibrant visual appeal, making these bars perfect for spring or summer gatherings.
These magic bars are incredibly easy to prepare, requiring minimal effort and fewer ingredients than you might expect. With such a straightforward approach, even beginner bakers can achieve excellent results. Once you know how to whip up this treat, it’s a dessert that you’ll want to keep in your rotation!
Why You’ll Love This
There are several reasons why Raspberry Coconut Magic Bars will become a favorite in your household. First and foremost, the taste is absolutely delightful. The tangy raspberries perfectly balance the sweetness of the coconut, delivering a flavor profile that tickles your palate. Furthermore, they have a wonderful texture: the base is crisp and buttery, while the topping is chewy and rich, making each bite a satisfying experience.
One of the biggest benefits of this recipe is its ease. With just a few simple steps, you can have a dessert ready to serve. This is especially beneficial for busy parents or those who may not have much time to devote to complicated baking processes. You can effortlessly make these bars for family gatherings, picnics, or even a last-minute dessert for guests.
Another reason to love this recipe is its cost-effectiveness. The ingredients needed are generally low-cost and easy to find at any grocery store, making it a budget-friendly dessert option. Additionally, it’s versatile; feel free to swap in different fruits or nuts based on your preference or seasonal availability. Lastly, this dessert is also relatively easy to make healthier by using alternative sweeteners or gluten-free options!
However, many people have misconceptions about “magic bars,” thinking they’re overly complicated or rich. In reality, these bars are an excellent way to enjoy a sweet treat without overwhelming your senses or spending hours in the kitchen.
Ingredients You’ll Need
- Graham cracker crumbs: Usually form the base of the magic bars, providing that delightful crunch. You can substitute with gluten-free crackers if desired.
- Unsalted butter: Essential for binding the crust and adding flavor. Ensure it’s at room temperature for easier mixing.
- Sugar: A small amount is needed to sweeten the crust. Brown sugar can be used for a deeper flavor.
- Sweetened shredded coconut: This is the star ingredient for the topping, giving the bars their unique texture and tropical flavor.
- Raspberries: Fresh or frozen; they provide a vibrant color and tangy sweetness that balances the other flavors beautifully.
- Sweetened condensed milk: This is what brings everything together, lending a creamy, rich texture to the bars.
- Vanilla extract: Just a splash adds an extra layer of flavor, enhancing the overall sweetness and aroma.
- Salt: A pinch of salt elevates the sweetness and balances the flavors.
Understanding the role of each ingredient not only helps you appreciate the recipe but also encourages you to experiment. For example, if you’re looking to add a nutty flavor, consider mixing in some chopped pecans or almonds along with the coconut.
How to Make
- Preheat your oven to 350°F (175°C) and grease a 9×13 inch baking dish. This ensures that once the magic bars are baked, they come out easily without sticking to the pan.
- In a medium mixing bowl, combine the graham cracker crumbs, melted unsalted butter, and sugar. Mix well until the crumbs are well incorporated and resemble wet sand. This forms the crust that will hold everything together.
- Press the crumb mixture evenly into the bottom of the prepared baking dish. This step is crucial; using the back of a measuring cup helps compact the crust effectively. Bake in the preheated oven for about 10 minutes, or until lightly golden brown. The crust should be firm yet tender.
- While the crust is baking, prepare your topping. In a large bowl, combine sweetened shredded coconut, fresh or frozen raspberries, and sweetened condensed milk. The condensed milk acts as a binding agent, so you’ll want to make sure it’s evenly distributed, providing that gooey texture.
- Once the crust has baked, remove it from the oven and quickly pour the raspberry-coconut mixture over the hot crust. Use a spatula to spread it evenly, taking care not to disturb the crust underneath.
- Return the baking dish to the oven and bake for an additional 20-25 minutes, or until the topping is golden brown and bubbly. The smell will be heavenly during this time, making it nearly impossible to resist licking the spoon!
- Once baked, remove the pan from the oven and let it cool on a wire rack. This cooling period will help the bars set properly. Using a sharp knife, cut into squares after they have cooled completely. For cleaner cuts, you can chill them briefly in the refrigerator before slicing.
Following these steps will ensure you achieve that ideal crispy-to-chewy ratio that makes these bars a treat to remember. Always pay attention to the baking times; it’s crucial to avoid overbaking, which can lead to a dry texture.
Variations & Substitutions
Chocolate Hazelnut Magic Bars: If you’re a chocolate lover, try incorporating chocolate hazelnut spread into the mixture. Instead of using raspberries, you can spread a thin layer of the spread over the baked graham cracker crust before adding the coconut. This substitution will add a rich, nutty flavor and an indulgent chocolate component to your bars, perfect for special occasions or just because!
Nut-Free Version: For friends or family with nut allergies, make these bars completely nut-free. Ensure that all ingredients are checked and certified nut-free. You could replace any nut-based toppings with more shredded coconut or even some chopped seeds for added texture. These bars will still be delicious and safe for everyone to enjoy.
Fruit Variations: Don’t be afraid to mix and match the fruit additions! Instead of raspberries, try chopped strawberries, blueberries, or even bananas. Each fruit will lend its unique flavor, and by adjusting the amount of sweetened condensed milk slightly, you can balance out the sweetness based on the fruit’s tartness.
Vegan Magic Bars: If you want to make these magic bars vegan, you can replace the eggs and dairy. Use coconut oil instead of unsalted butter. Replace the sweetened condensed milk with a homemade version made from coconut cream and sweetener. You can also choose a dairy-free chocolate to garnish, like dark chocolate chips for added richness.
Gluten-Free Option: For a gluten-free version, simply swap out the graham cracker crumbs with gluten-free ones or use ground oats instead. These adjustments will allow those with gluten sensitivities to enjoy the bars without compromising on taste or texture.
Exploring these variations not only allows you to customize the recipe to your tastes but also lets you cater to guests with different dietary needs, ensuring everyone at your gathering can enjoy a slice of magic.
Common Mistakes to Avoid
One common mistake when making Raspberry Coconut Magic Bars is not allowing the crust to bake long enough. It’s crucial to pre-bake the crust until it’s slightly golden. If underbaked, the bottom might turn soggy once the topping is added. Always pay attention to color; it’s a good indicator of doneness.
Another pitfall is skipping the cooling time. Many tend to cut into the bars while they are still warm. While it can be tempting, letting them cool fully helps them set, allowing for clean and even cuts. If you’re in a rush, place them in the refrigerator for a quick chill.
Additionally, not measuring ingredients accurately can lead to inconsistency in taste and texture. A scoop of flour or coconut can greatly affect the final product, so use dry measuring cups for dry ingredients and liquid cups for liquids.
Lastly, be cautious when using frozen raspberries. If you opt for them, do not thaw them before adding, as this will release moisture, making the topping soggy. Instead, add them straight into the mixture to keep the crust crisp.
Storage, Freezing & Reheating Tips
To store your Raspberry Coconut Magic Bars, place them in an airtight container, ideally in a single layer to prevent them from sticking together. They will maintain their best quality when stored in the refrigerator, where they can last for up to a week.
If you want to keep them for longer, consider freezing them. It’s advisable to cut the bars into squares before freezing; this makes it easier to take out individual portions when cravings strike! Wrap each square in plastic wrap or aluminum foil, then place them in a freezer-safe container or bag. Be sure to label with the date. Frozen bars can last up to three months. When you’re ready to enjoy one, allow it to thaw in the refrigerator overnight or let it sit at room temperature for about 30 minutes.
One key safety tip is to always check your ingredients’ expiration dates. Condensed milk, for instance, can have a long shelf life, but once opened, ensure you refrigerate any unused portions and consume them within a few days.
Frequently Asked Questions
Can I use different fruits in the recipe?
Absolutely! You can substitute other fruits like blueberries, strawberries, or even peaches. Just remember that the level of sweetness and tartness may vary, so you might need to adjust the quantity of sweetened condensed milk accordingly.
Are magic bars gluten-free?
Traditional magic bars are not gluten-free due to graham crackers, but you can easily make them gluten-free by using gluten-free graham cracker crumbs or ground nuts as your base.
How can I make these bars healthier?
You can reduce the sugar content by using a natural sweetener or sugar substitute. Another option is to increase the amount of oats or coconut while decreasing the sweetness to create a heartier, more nutritious snack.
Do I need to grease the baking dish?
Yes, greasing the baking dish is essential. It ensures that the bars don’t stick, making it easier for you to remove them once set. You can either use cooking spray or line the dish with parchment paper for easier lifting.
Can I make these bars ahead of time?
Definitely! In fact, they often taste even better a day or two after baking as the flavors have more time to meld together. Just follow the storage tips to keep them fresh until you’re ready to serve.
Conclusion:
Raspberry Coconut Magic Bars are a splendid combination of nostalgic flavors that echo the essence of spring and joy. Their simplicity in preparation allows you to impress friends and family with minimal effort while still hitting all the right sensory notes—taste, texture, and visual appeal. Whether you serve them at a picnic, for a potluck, or as a sweet ending to a family dinner, these bars will surely enchant everyone.
I encourage you to try making these magic bars yourself. Don’t hesitate to customize the recipe to match your preferences or dietary needs. The best part is how forgiving and versatile this recipe is, allowing for endless variations. So roll up your sleeves, gather your ingredients, and dive right into the magic of baking! Share your creations, and remember, your version could inspire someone else to unleash their inner baker!