Prep time: 20 minutes
Cook time: 0 minutes
Total time: 20 minutes
Servings: 24 Oreo balls
For those of you craving something sweet, look no further than these delightful Easy No-Bake Oreo Balls! Imagine a dessert that melds the rich, creamy flavor of a classic Oreo cookie with the lusciousness of cream cheese, rolled into bite-sized balls and then coated with silky chocolate. It’s a treat that never fails to impress at parties, celebrations, or even just a cozy movie night at home. What truly makes this recipe special is its simplicity and the happiness it brings with every bite. Especially for busy parents or those new to cooking, these Oreo balls can be thrown together in less than half an hour. You’ll learn how to create this mouthwatering dessert that’s versatile enough for any kind of occasion.
These Easy No-Bake Oreo Balls are not only incredibly tasty but are also super adaptable. Whether you prefer a simple chocolate coating or want to jazz things up with white chocolate or festive sprinkles, the possibilities are endless. Not to mention, this dessert is perfect for those who are looking for easy solutions in the kitchen without sacrificing taste. So roll up your sleeves and get ready to make these eye-catching, delectable treats that will surely disappear in no time!
What Is Easy No-Bake Oreo Balls Recipe – Best Dessert for Parties?
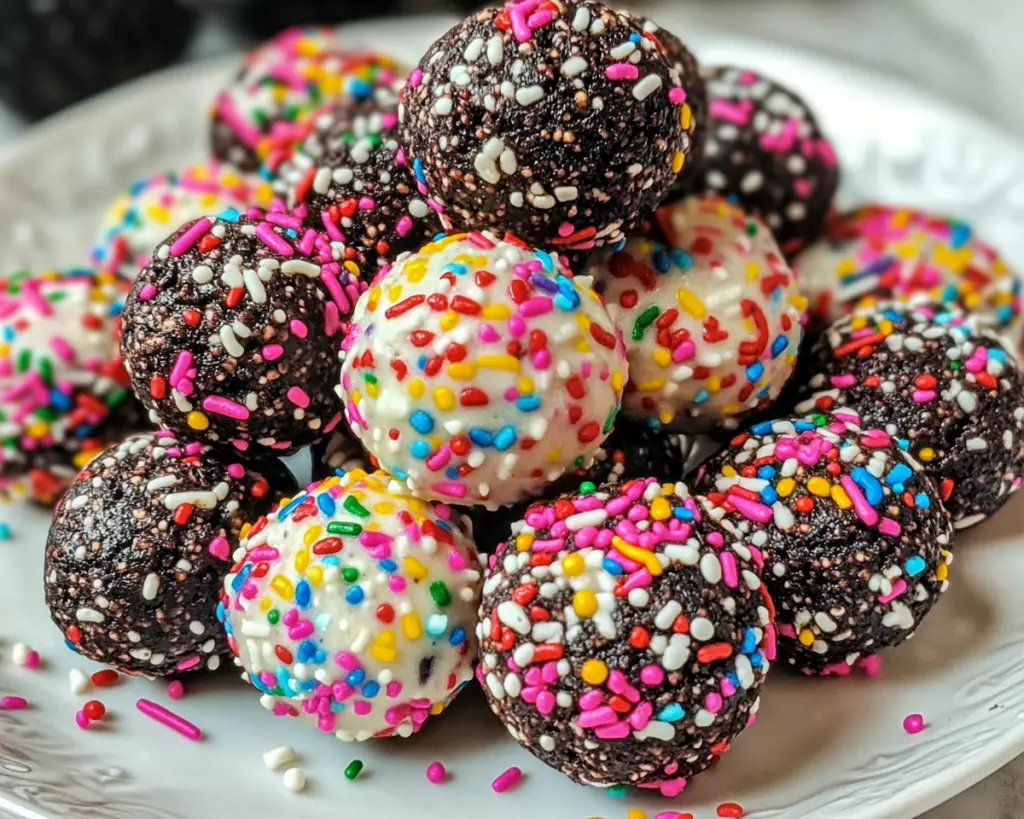
Easy No-Bake Oreo Balls are a no-fuss, incredibly satisfying dessert that spoils your taste buds. Originating from the classic combination of cookies and cream, this dessert uses the beloved Oreo cookie as its base. The blending of crushed Oreos with softened cream cheese creates a smooth, rich mixture that holds together beautifully when rolled into balls. When coated in chocolate, these balls achieve a glossy finish that adds to their appeal. The texture of each bite offers a delightful contrast between the creamy interior and the crunchy outer layer, making them irresistible.
The flavor profile is simply divine—sweet, rich, and just the right amount of chocolatey goodness. The combination of the Oreo’s cocoa flavor and cream cheese creates a balance that is both comforting and indulgent. You may find that these treat balls are not just an average dessert; they’re often a hit at parties, family gatherings, or even as a simple after-dinner treat. People often reminisce about their favorite childhood cookies while enjoying these, making them a nostalgic snack for many.
What you’ll learn with this recipe goes beyond just the technique; you’ll also discover tricks for perfecting the flavor, tricks for achieving a smooth coating, and a range of exciting variations to keep things fresh and tailored to different preferences.
Why You’ll Love This
There are many reasons to love these Easy No-Bake Oreo Balls! Firstly, they are incredibly delicious; the combination of the chocolate cookie and cream filling is a match made in heaven. The ease of this recipe makes it ideal for crafters, busy parents, or anyone trying to balance a hectic lifestyle. In just 20 minutes, you can whip up a delightful dessert without even turning on the oven! This is particularly beneficial during hot summer days when you’d rather not heat up your kitchen.
From a cost perspective, this recipe is quite economical. Most of the ingredients are budget-friendly and can be bought at your local grocery store. By making these delicious treats at home, you save money compared to expensive store-bought options, allowing for impressive dessert offerings without breaking the bank.
Versatility is another compelling factor. You can easily modify this recipe to accommodate different taste preferences or dietary restrictions. Need a gluten-free option? Use gluten-free Oreo cookies! Want to cut back on sugar? Experiment with sugar-free versions of the ingredients. Unlike many desserts that require precise measurements and cooking skills, these Oreo Balls embrace a more forgiving nature.
While some might think that dessert making requires advanced skills or culinary training, this recipe proves otherwise. You can rest assured that even beginners will find success, making it an excellent opportunity to bond with friends or family members in the kitchen—an experience that anyone can relish.
Ingredients You’ll Need
- Oreo cookies: The star ingredient, providing the base flavor and texture. You may substitute with gluten-free Oreos if necessary.
- Cream cheese: Adds creaminess and helps bind the ingredients together. You can use low-fat cream cheese for a lighter version.
- Chocolate (dark or white): Used for coating, lending a rich chocolate flavor. Choose high-quality chocolate for the best results, or try flavored melts for fun twists.
- Optional toppings: Sprinkles, crushed nuts, or shredded coconut add visual appeal and texture. They enhance the overall presentation and customize your dessert.
Each ingredient plays a pivotal role in bringing this recipe to life. The combination of Oreos and cream cheese forms the rich base. If you’re considering alternatives, keep in mind that the cream cheese can contribute to the overall taste significantly, so keep that in balance when selecting substitutes. Always be mindful of the ingredient’s role in the final dish.
How to Make
Follow these step-by-step instructions for a successful batch of Easy No-Bake Oreo Balls:
- Begin by preparing your workspace and gathering all the ingredients. Start with a pack of Oreo cookies and place them in a large mixing bowl. If you have a food processor, this can speed things up; otherwise, a sturdy zip-top bag and a rolling pin will do just fine. Crush the cookies until they resemble fine crumbs, ensuring there are no large chunks remaining.
- Next, add the softened cream cheese to the bowl with your crushed Oreos. Use a spatula or your hands to mix the ingredients together thoroughly. It may seem crumbly at first, but keep mixing until all of the cream cheese is incorporated and the mixture holds together when pressed. This step is crucial to achieving a smooth and creamy texture in the final product.
- Once you have a well-combined mixture, use your hands to take small amounts and roll them into balls about 1 inch in diameter. If you find that your hands are getting sticky, consider using a small scoop to portion out the dough before rolling. Place the formed balls on a baking sheet lined with parchment paper, leaving a bit of space between each one to prevent them from sticking together.
- Now, it’s time to melt the chocolate for coating. You can do this using a microwave or a double boiler. If using the microwave, heat the chocolate in 30-second increments, stirring after each session until fully melted and smooth. Be careful not to overheat as this can cause the chocolate to seize.
- Once your chocolate is melted, dip each Oreo ball into the chocolate using a fork or toothpick. Make sure it’s fully coated and let any excess chocolate drip off before placing it back onto the prepared baking sheet. You may choose to sprinkle crushed Oreos or any desired toppings on top while the chocolate is still wet for added flair.
- After coating all the balls, let them sit at room temperature for a bit to firm up, or, for quicker results, refrigerate them for about 30 minutes until the chocolate is set. This allows the coating to harden, and the flavors to meld beautifully.
Your Easy No-Bake Oreo Balls are now ready to serve! Place them in a decorative bowl or on a platter to showcase their irresistible allure. Enjoy these treats fresh, or store them in the fridge for later when the sweet tooth strikes.
Variations & Substitutions
Chocolate Mint Oreo Balls: If you’re a fan of mint chocolate, consider using Mint Oreo cookies instead of the classic variety. The refreshing mint flavor adds an exciting twist that can elevate the dessert. Simply substitute the regular Oreos and follow the same steps. You might even consider adding a few drops of peppermint extract to the cream cheese mixture for an extra zing.
Peanut Butter Oreo Balls: For those who love the irresistible combination of chocolate and peanut butter, add a spoonful of creamy peanut butter to your cream cheese mixture. This variation not only enhances the flavor but also adds a layer of richness. Make sure to mix it thoroughly so the peanut butter is evenly distributed. You could even roll the balls in crushed peanuts or drizzle melted peanut butter on top for added texture.
White Chocolate Strawberry Oreo Balls: Using strawberry-flavored Oreos can create a unique dessert perfect for spring or summer gatherings. Replace the dark chocolate coating with white chocolate and consider adding a hint of freeze-dried strawberries into the mix. This will balance the sweetness with a refreshing berry flavor. Decorate them with pink sprinkles for a colorful finish!
Overall, these variations show just how easy it is to tailor the recipe to fit your preferences or the season. Whether you’re celebrating a holiday or simply want to indulge, these adaptations are sure to impress guests.
Common Mistakes to Avoid
It’s essential to be mindful of potential pitfalls when making Easy No-Bake Oreo Balls. One common mistake is not softening the cream cheese adequately. If the cream cheese is too cold, it won’t blend well with the Oreos, making it difficult to form smooth balls. Ensure the cream cheese sits out for at least 30 minutes to soften before mixing.
Another issue can arise during the chocolate coating phase. If the chocolate is overheated, it may seize up and become clumpy, which will adversely affect the look and taste of your Oreo balls. Always melt chocolate in controlled intervals, stirring frequently. Keep a watchful eye; once it’s melted, take it off the heat immediately.
Not refrigerating the balls after rolling them can also lead to disappointment. Allowing them to chill helps set the chocolate coating properly, ensuring a beautiful finish. Skipping this step may result in the chocolate not adhering as well, leading to a messier presentation.
By being aware of these common pitfalls and following the steps carefully, you can avoid mishaps and create sensational Oreo Balls that will leave everyone asking for more!
Storage, Freezing & Reheating Tips
To keep your Easy No-Bake Oreo Balls fresh, it’s vital to store them properly. Place them in an airtight container in the refrigerator; they can last up to a week. Make sure to separate layers with parchment paper to prevent sticking.
If you want to prepare them in advance, consider freezing them. Place the Oreo balls on a tray until they’re firm, then transfer them to a freezer-safe bag or container. They can be stored in the freezer for about two months. When you’re ready to enjoy them, simply let them thaw in the refrigerator for a few hours before serving.
When it comes to reheating, there’s no need for this recipe, as you’ll want to enjoy the cold, creamy texture of the Oreo balls. Remember to practice food safety when handling cream cheese, as it can spoil if not stored properly.
Adhering to these storage and safety tips will help you enjoy these delectable treats for days, maximizing both convenience and taste!
Frequently Asked Questions
Can I use other types of cookies besides Oreos?
Absolutely! While this recipe is centered around Oreos, you can experiment with other cookies or even biscuits. Just keep in mind that the flavor will change based on your choice. Options like chocolate wafers or even gluten-free cookies can work well, allowing for a personalized touch. The key is to make sure the cookies are sturdy enough to hold their shape when crushed.
Do I need to chill the balls before coating them in chocolate?
Yes, chilling the Oreo balls for about 30 minutes allows them to firm up, making them easier to handle when you dip them into chocolate. If they are too soft, they may crumble during the coating process, leading to messy chocolate-covered balls. Chilling not only helps with handling but also contributes to the final texture.
Can I make these Oreo balls vegan?
Certainly! To create a vegan version of this delicious dessert, simply substitute the cream cheese for a plant-based alternative. You can also use dairy-free chocolate for the coating. This way, you can enjoy the same delightful flavors while accommodating vegan dietary needs.
How do I keep my coating smooth?
To achieve a smooth chocolate coating, ensure that your chocolate is properly melted and avoid any water contact, as moisture can cause it to seize. Additionally, dipping tools like forks or toothpicks can help you coat each ball without making a mess. If the chocolate starts to thicken, you can reheat it slightly and stir it again for a smoother consistency.
What’s the best way to decorate my Oreo balls?
Decorating your Oreo balls is a great way to showcase your creativity! You can use colored sprinkles, crushed nuts, or even edible glitter. For a professional touch, consider drizzling melted chocolate over them in a contrasting color. Let your imagination run wild; these tasty treats are as much about presentation as they are about flavor!
Conclusion:
These Easy No-Bake Oreo Balls are a delightful treat that’s sure to leave a lasting impression. With their creamy texture and rich flavors, they capture the essence of indulgence while being effortless to prepare. Whether you’re entertaining guests or just craving something sweet, this recipe is highly adaptable, allowing you to customize it as you please. Try out different variations or stick with the classic; either way, you’re in for a real treat. So grab those ingredients and get ready to create a dessert that your friends and family will adore. Watch how quickly they disappear from your table! Happy cooking!


