Prep time: 30 minutes
Cook time: 45 minutes
Total time: 1 hour 15 minutes
Servings: 8
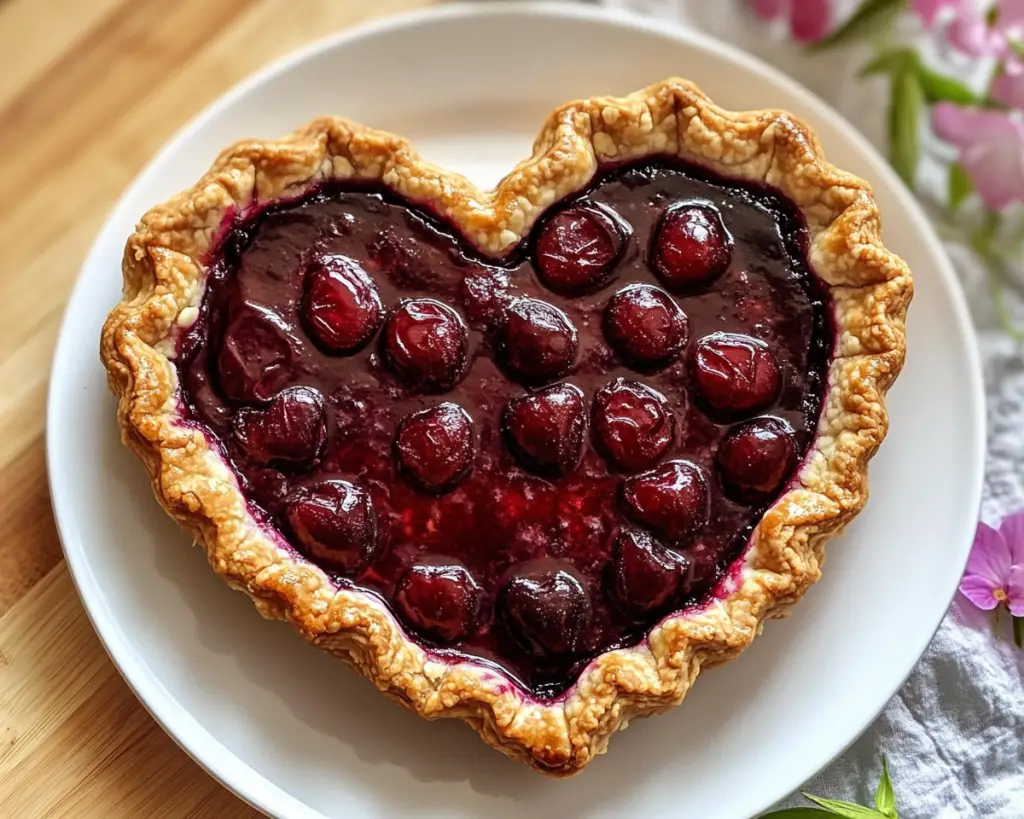
When it comes to Valentine’s Day, few desserts can evoke the same warmth and love as a homemade pie. The aroma of warm cherry filling melding with a buttery, flaky crust is enough to make anyone’s heart skip a beat. The Heart Shaped Cherry Pie is not just a dessert; it’s a statement of affection. Whether you are impressing your partner, celebrating a special occasion with family, or indulging in a sweet treat yourself, this pie adds a unique charm to any gathering.
This recipe is not only delicious but also surprisingly simple to make. You will learn how to prepare a perfect cherry filling, create a delightfully flaky crust, and shape it into a heart to convey your love. Get ready to fill your kitchen with enticing aromas and make heartwarming memories.
What Is Heart Shaped Cherry Pie Recipe – Easy Valentine’s Day Dessert?
The Heart Shaped Cherry Pie is a delightful dessert that celebrates both the flavors of ripe cherries and the spirit of love. Originating from classic American pie traditions, this recipe incorporates a flaky pie crust filled with a sweet and slightly tangy cherry filling, striking a perfect balance that keeps you coming back for more. The heart shape adds an element of whimsy and romance, making it a popular choice for couples, families, and anyone who appreciates a heartfelt gesture.
The texture of the pie is equally mouthwatering. The crust is golden brown and flaky, while the filling is luscious and vibrant red, bursting with fresh, juicy cherry goodness. With every slice, you will experience the crunch of the crust followed by the warm, comforting flavors of the cherry filling. This pie is not just visually appealing; it’s a sensory delight that fills the room with the aroma of dessert bliss.
This dessert is versatile as well. You can customize it by using different types of cherries or even other fruits if desired. With a few simple variations, you can transform this basic recipe into an entirely different treat, making it a wonderful addition to any recipe collection.
Why You’ll Love This
There are countless reasons to fall in love with this Heart Shaped Cherry Pie. First and foremost, the taste is phenomenal; the sweet cherry filling pairs perfectly with the flaky crust, creating a harmonious blend of flavors that dances on your palate. Secondly, the ease of preparation makes this dessert approachable for all skill levels, whether you are a seasoned chef or a beginner tackling your first pie. It is relatively quick to prepare, allowing you to whip it up even on a busy day.
Another crucial factor is the cost-effectiveness of making your own pie at home. Store-bought alternatives can be expensive and often lack the freshness and personalization you can achieve at home. By preparing this pie yourself, not only do you save money, but you also control the ingredients, ensuring they align with your health and flavor preferences. Furthermore, you can impress your loved ones with this delightful homemade dessert, showcasing your baking prowess.
However, some may express hesitation, worrying that making a pie is too complicated. This is a common misconception. With helpful tips and a straightforward recipe, anyone can successfully create this beautiful dessert. A homemade pie is not just a calorie-laden indulgence; it can also be a part of a *balanced, heart-healthy lifestyle*.
Ingredients You’ll Need
- Pie Crust: You can use store-bought or homemade pie crust. A homemade crust offers freshness and can be tailored to your taste.
- Fresh Cherries: You will need about 4 cups of fresh pitted cherries. If fresh cherries aren’t available, frozen cherries work well too.
- Sugar: A mix of granulated sugar and brown sugar enhances the flavor of the cherry filling.
- Cornstarch: This ingredient acts as a thickener for the cherry filling, ensuring it’s not watery.
- Lemon Juice: Fresh lemon juice adds acidity that complements the cherry flavor and balances the sweetness.
- Vanilla Extract: A splash of vanilla adds depth to the filling.
- Salt: A pinch brings out the sweetness of the cherries.
- Egg Wash: A beaten egg or milk helps create a golden, glossy finish on your pie crust.
Each ingredient plays a crucial role in making the pie unforgettable. The pie crust is your foundation, providing the flaky texture that contrasts wonderfully with the gooey cherry filling. The cherries, of course, are the star of the show, contributing both flavor and color. The balance of sugars adds complexity to the filling, while cornstarch ensures it holds together well. Lemon juice and vanilla round out the flavor profile, making every bite a harmonious blend of sweet and tart.
How to Make
- Prepare the Pie Crust: If you are making your own pie crust, combine flour and salt in a bowl. Cut in butter until the mixture resembles coarse crumbs. Gradually add cold water, mixing until dough forms a ball. Wrap in plastic wrap and chill for at least 30 minutes.
- Preheat the Oven: Preheat your oven to 425°F (220°C). This ensures the pie crust starts baking immediately for that flaky texture.
- Make the Cherry Filling: In a large bowl, mix together the pitted cherries, granulated sugar, brown sugar, cornstarch, lemon juice, vanilla extract, and salt. Stir gently until the cherries are well coated in the mixture. Let it sit for a few minutes to allow the juices to develop.
- Roll Out the Dough: After chilling, divide the dough into two halves. Roll out one half on a floured surface to fit a 9-inch pie tin. Carefully transfer it to the pie tin, pressing it gently to form a crust.
- Fill the Pie Crust: Pour the cherry filling into the prepared pie crust, spreading it evenly. Don’t overload it; you want the filling just below the rim.
- Top the Pie: Roll out the second half of the dough and cut it into heart shapes. You can use a cookie cutter for this. Arrange the hearts artistically on top of the filling. This forms a beautiful, decorative crust while allowing steam to escape.
- Brush with Egg Wash: Beat an egg and brush it generously over the top crust. This will create a lovely golden color as it bakes.
- Bake the Pie: Place the pie in the preheated oven and bake for about 40 to 45 minutes or until the crust is golden brown and the filling is bubbling. Keep an eye on it; if the edges brown too quickly, cover them with foil.
- Cool Before Serving: Once baked, remove the pie from the oven and allow it to cool for at least 15 minutes before slicing. This resting time helps the filling set up properly.
Baking takes practice, so don’t get discouraged if your first pie isn’t perfect. The key is patience and attention to detail. Enjoy the process and savor the delightful scents wafting through your kitchen!
Variations & Substitutions
Berry Blend Variation: For a unique twist, consider mixing different berries such as raspberries, blueberries, or strawberries with the cherries. This will add more depth to the flavor, making it even more vibrant. This adaptation is perfect for those who enjoy a medley of flavors and colors. When using berries with varying sweetness, adjust the amount of sugar according to your taste. This blend is a great option for anyone looking to try something beyond traditional cherry pie.
Gluten-Free Version: If you or your loved ones are gluten-intolerant, you can make this pie using a gluten-free pie crust. Many stores offer premade gluten-free crusts, or you can make your own using gluten-free flour blends. The filling remains the same; just ensure the thickening agent is suitable for gluten-free diets. This version allows those with dietary restrictions to indulge without feeling left out during celebrations.
Dairy-Free Option: For a dairy-free pie, use margarine or coconut oil instead of butter in the crust. The filling remains dairy-free as it usually contains no dairy products. Ensure your egg wash is substituted with a non-dairy alternative, like almond or soy milk. This will keep the pie looking golden and beautiful while catering to those avoiding dairy.
Sweetener Substitution: If you’re looking for a healthier option, consider using alternative sweeteners like honey, agave syrup, or a sugar substitute suitable for baking. Adjust the quantity to taste, as different sweeteners have varying levels of sweetness. This variation is excellent for those watching their sugar intake, allowing you to enjoy the delightful cherry pie without the extra calories.
Common Mistakes to Avoid
One common mistake is not allowing the pie crust to chill adequately. Skipping this step leads to a tough crust, defeating the purpose of having a tender, flaky pastry. Always ensure your dough is well-chilled before rolling out.
Another frequent error is overfilling the pie. It’s tempting to cram as much filling as possible, but this will lead to overflow during baking. Keep the filling just below the crust edge to allow for bubbling and expansion.
Lastly, be cautious with the baking time. Opening the oven door too frequently to check can cause heat loss and lead to an uneven bake. Instead, rely on the timer and check only as necessary. By being vigilant about these common mistakes, you can significantly improve the quality of your pie.
Storage, Freezing & Reheating Tips
To store your Heart Shaped Cherry Pie, allow it to cool completely, then cover it with plastic wrap or aluminum foil to maintain moisture. It can be stored in the refrigerator for up to 3 to 4 days. If you’d like to enjoy it later, you can freeze it as well.
Freezing: For long-term storage, wrap the cooled pie tightly in plastic wrap before placing it in a freezer bag. It can be frozen for up to 2 months. When you’re ready to enjoy it, transfer the pie to the refrigerator to thaw overnight before reheating.
Reheating: To reheat, preheat the oven to 350°F (175°C). Place the pie on a baking sheet and cover it loosely with foil, allowing it to warm for about 15-20 minutes. This method will help maintain the crust’s flakiness while warming the filling.
When it comes to food safety, always discard any leftover pie that has been left out at room temperature for more than two hours. It’s essential to ensure food is stored adequately to avoid spoilage.
Frequently Asked Questions
Can I use store-bought cherry filling instead of fresh cherries?
Absolutely! You can save time by using store-bought cherry filling. Just make sure to check the sweetness level, as some premade fillings can be overly sweetened. Adjust your sugar accordingly if you decide to mix in fresh fruit.
Can I make the pie crust ahead of time?
Definitely! The pie crust can be made ahead of time and stored in the fridge for up to 2 days. You can also freeze it for up to a month, just make sure to let it thaw overnight in the refrigerator before rolling it out.
How do I know when my pie is done?
Your pie is done when the crust is golden brown and the filling is bubbling through the vents. An internal thermometer can help; the filling should be around 200°F (93°C) when fully cooked.
What type of cherries should I use for the filling?
You can use sweet cherries or tart cherries based on your preference. Sweet cherries will yield a more sugary pie, whereas tart cherries will offer a bright flavor that contrasts nicely with the crust.
Can I customize the shape of the pie?
Yes! While a heart shape is ideal for Valentine’s Day, you could also make this pie round or in individual mini sizes. The filling and baking time will remain relatively the same, although smaller pies may require slightly less baking time.
Conclusion:
The Heart Shaped Cherry Pie offers a delightful blend of flavor, texture, and creativity that celebrates love in all its forms. It’s a recipe that is simple yet impactful, allowing even beginner bakers to impress their loved ones. With variations to suit different needs and preferences, there are countless ways to make this dessert uniquely yours. So pick up the ingredients, roll up your sleeves, and get ready to create not just a beautiful pie but also cherished memories. Share your baking results with friends and family, or keep it all to yourself — either way, you won’t regret diving into this sweet, heartwarming treat!