Prep time: 15 minutes
Cook time: 0 minutes
Total time: 15 minutes
Servings: 20 balls
There’s something undeniably delightful about treating yourself to a little sweet indulgence without the guilt that often accompanies desserts. Enter Chocolate Coconut Bliss Balls. This easy no-bake healthy snack embodies everything you could ask for in a quick sweet treat: it’s quick to whip up, satisfies your chocolate cravings, and can be made with wholesome ingredients that nourish your body. Imagine these bite-sized heavenly orbs melting in your mouth, their texture a delightful blend of chewy and creamy, while their rich chocolate flavor tantalizes your taste buds.
What makes this recipe so special is not just its incredible flavor but also how it fits seamlessly into various lifestyles—be it for busy parents looking for a snack to satisfy kids after school, health-conscious individuals wanting a nutritious option to curb cravings, or anyone simply wanting a delicious sweet fix. Plus, you’ll learn how to customize these bliss balls with various ingredients and flavors, tailoring them to your liking.
What Is Chocolate Coconut Bliss Balls Recipe – Easy No-Bake Healthy Snack?
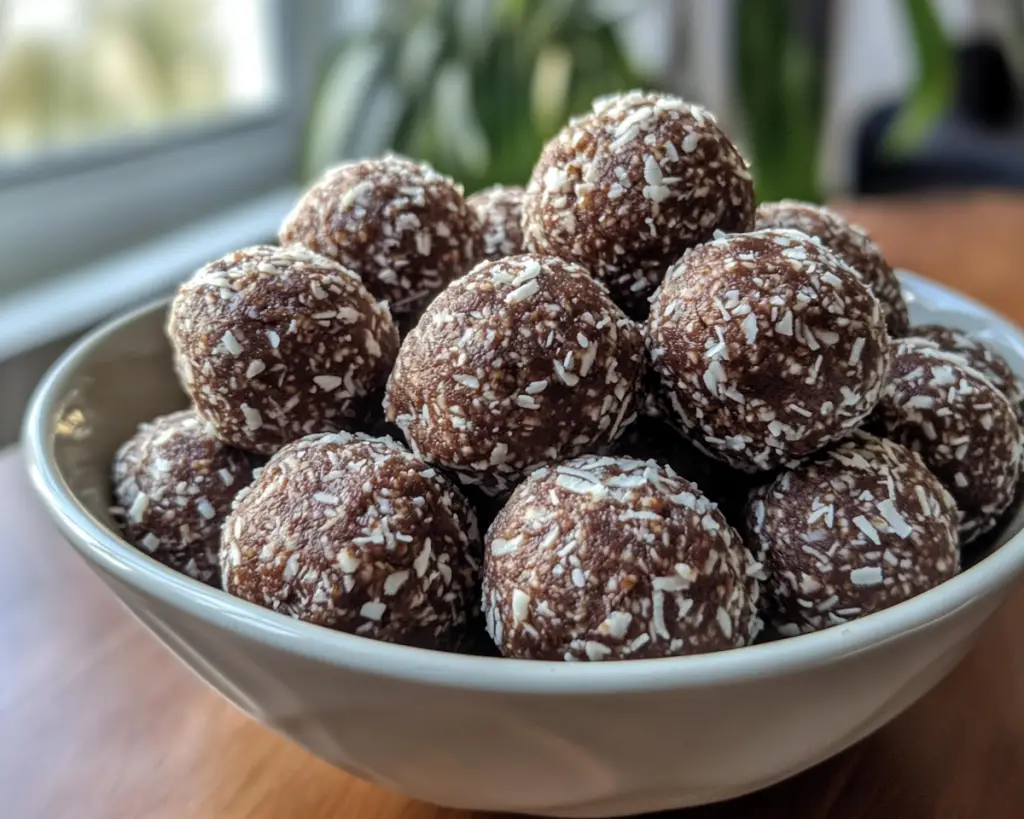
Chocolate Coconut Bliss Balls are small, dense, and flavorful bites made primarily from whole food ingredients. The combination of dark chocolate and unsweetened coconut gives them their rich flavor while providing a satisfying chew. Historically, these kinds of no-bake energy bites have been popularized as part of the **whole foods** movement, providing an alternative to traditional baked goods that often come loaded with sugars and preservatives.
The beauty of these bliss balls lies in their simplicity. They are usually prepared by blending together the key ingredients, rollings them into balls, and chilling them to set. The texture is chewy yet light, owing to the nuts or oats, balanced by the smoothness of the chocolate and the tropical hint of coconut. They’re great for physical or emotional nourishment, making them the ideal snack for any occasion.
While chocolate has often been associated with indulgence, when paired with wholesome ingredients like oats and coconut, these bites take on a new, virtuous character. You can enjoy them as an afternoon snack, a post-workout fuel, or even as a dessert that feels decadent but is packed with nutrients.
Why You’ll Love This
There are a multitude of reasons why you’ll fall in love with this Chocolate Coconut Bliss Balls recipe. For one, they are incredibly easy to prepare. Since no baking is involved, even beginners in the kitchen can confidently tackle this recipe. With just a handful of ingredients easily accessible at most grocery stores, you won’t need to make a special trip to gather supplies.
These bliss balls not only tickle the taste buds but also allow you to manage your health without sacrificing flavor. The natural sweetness from dates or honey, combined with complex carbohydrates from oats, makes them a filling option that won’t lead to a sugar crash later. They are perfect for meal prep, allowing you to make a larger batch at once and store them for quick snacking during the week.
Furthermore, these bliss balls are versatile. You can experiment with various flavor combinations or dietary restrictions, appealing to vegans, gluten-free eaters, or anyone watching their sugar intake. With customization options galore, you can always keep your tastebuds guessing while enjoying a healthy treat.
Notably, avoiding common misconceptions can help you make the most of this snack. Some people think that healthy snacks have to be bland or difficult to prepare. This recipe debunks that myth, assuring you that healthy can indeed mean delicious. Once you give these bliss balls a try, they’ll definitely become a staple in your kitchen.
Ingredients You’ll Need
- Rolled oats: These provide a nutritious base for your bliss balls, offering fiber and sustaining energy. You can substitute with gluten-free oats if necessary.
- Nut butter: Almond butter or peanut butter are fantastic options, but feel free to use any nut or seed butter. This ingredient adds creaminess and binds the mixture together.
- Medjool dates: Naturally sweet and rich in nutrients, dates are the perfect sweetener for this recipe. If you need a substitute, consider maple syrup or agave nectar but adjust quantities.
- Cocoa powder: Unsweetened cocoa powder provides that essential chocolate flavor. For a sweeter alternative, you could use cacao powder, known for its less processed nature.
- Unsweetened shredded coconut: This adds a delightful chewiness and a tropical aroma to the bliss balls. For a different flavor profile, you might use finely chopped nuts or seeds.
- Vanilla extract: This enhances the overall flavor, bringing all the ingredients together. Ensure you use pure vanilla extract for the best taste.
- Salt: A pinch of salt elevates the flavors, balancing sweetness. Don’t skip this crucial element!
Gathering these basic ingredients gives you the freedom to experiment. For added convenience, you can incorporate superfoods such as chia seeds or flaxseeds, offering an extra punch of nutrition and texture. Each ingredient plays a significant role in not only enhancing flavor but also in creating a nutritious snack that satiates your cravings.
How to Make
Follow these step-by-step instructions to make your Chocolate Coconut Bliss Balls:
- Prepare the Ingredients: Start by gathering all your ingredients to ensure a smooth cooking process. You will need rolled oats, nut butter, Medjool dates, cocoa powder, shredded coconut, vanilla extract, and salt. Chop the dates to smaller pieces if they’re not soft; this will help blend them more effectively.
- Combine Dry Ingredients: In a large mixing bowl, combine the rolled oats, cocoa powder, and shredded coconut. This step is crucial as it evenly distributes the dry components, making mixing later much easier!
- Blend the Sweetness: In a food processor, add the chopped dates along with the nut butter and vanilla extract. Blend until you achieve a thick, sticky paste. Scrap down the sides occasionally to ensure even mixing. The mixture should be smooth and creamy!
- Mix Together: Pour the blended wet mixture into the bowl containing your dry ingredients. Use a spatula or spoon to combine them well until fully integrated. At this point, you should see a thick dough forming. If it feels too dry, you can add a tablespoon or two of water to help bind it.
- Roll Into Balls: Use your hands to scoop out small portions of the mixture and roll them into bite-sized balls. You aim for about one inch in diameter. If the mixture is sticky, wet your hands slightly to avoid sticking problems.
- Chill to Firm: Place the rolled balls on a baking sheet lined with parchment paper. Once you have rolled all of the mixture, chill the bliss balls in the refrigerator for about 30 minutes to allow them to firm up and set.
- Enjoy or Store: After chilling, your Chocolate Coconut Bliss Balls are ready to be devoured! Store any leftovers in an airtight container in the refrigerator for up to one week, or in the freezer for longer storage. These treats are perfect for grab-and-go snacking.
Making these bliss balls is not only easy but incredibly rewarding when you see how little time and effort it takes to concoct such a delightful treat. You’ll find yourself reaching for these bites over less nutritious options time and again.
Variations & Substitutions
Nut-Free Variation: If you’re catering to nut allergies, you can easily substitute the nut butter with sunflower seed butter. This option maintains the creamy texture while ensuring safety for those with nut sensitivities. You can also swap out the rolled oats with puffed rice or quinoa for a fun, airy texture.
Protein-Packed Variation: To amp up the nutritional value, consider adding a scoop of vanilla or chocolate protein powder to the mixture. This tweak not only enhances the protein content but can also make for a filling snack post-workout. Adjust the amount of nut butter slightly if the mixture becomes too dry, ensuring that the consistency remains right for rolling into balls.
Flavor-Rich Variation: Why not mix in a dash of cinnamon or a spoonful of almond extract for an aromatic twist? Not only do these spices elevate the flavor profile, but they also bring an extra layer of warmth to your bliss balls. If you’re feeling adventurous, add a tablespoon of espresso powder for a mocha flavor profile. This variety adds depth and is especially enjoyable for coffee lovers.
Raw Vegan Variation: This recipe is already a great candidate for a vegan snack, but you can further enhance this aspect by replacing honey with maple syrup or agave. Make sure to use raw cocoa powder and check that your nut butter contains no added sugars or preservatives. Each adjustment makes the bliss balls not only compliant with raw food diets but also keeps their integrity in taste.
Common Mistakes to Avoid
When preparing your Chocolate Coconut Bliss Balls, there are a few common mistakes that can detract from your final product. One crucial issue people encounter is using dates that are not soft enough. Dried dates can lead to a grainy texture in your bliss balls, so always ensure that your dates are plump and sticky. If you can only find dried dates, soak them in hot water for about 10 minutes to soften them before blending.
Another mistake includes not blending the wet ingredients long enough. Make sure the nut butter and dates are well combined into a smooth paste. This creates a cohesive mixture that makes the balls easier to form and enhances the final flavor. If you find your mixture too crumbly, add a tablespoon of water or nut milk until you reach the desired consistency.
Finally, avoid rolling your bliss balls too large. These are meant to be bites, so one-inch size is the sweet spot. Larger balls will lead to an imbalance in texture and might feel overwhelming to eat at once. Keeping them small and manageable makes for the perfect on-the-go snack.
Storage, Freezing & Reheating Tips
For proper storage, make sure your chocolate coconut bliss balls are kept in an airtight container to maintain freshness. In the refrigerator, they can last up to a week, making them perfect for meal prep. If you find you have extra, you can freeze them as well.
To freeze, place the bliss balls in a single layer on a baking sheet and freeze until solid. Then, transfer them into zip-top freezer bags or a freezer-safe container. This method not only prolongs their shelf life for up to three months but also ensures that they do not stick together.
When you’re ready to enjoy a frozen bliss ball, simply pull one from the freezer, allow it to thaw in the fridge for about 30 minutes, and enjoy. Alternatively, you can pop it in your mouth straight from the freezer for an icy treat, especially appealing on warm days!
Pay attention to food safety as well—always ensure that your hands and utensils are clean when preparing your food. This will help keep the bliss balls safe and ensure a pleasant eating experience.
Frequently Asked Questions
Can I use other sweeteners instead of dates? Yes, you can absolutely substitute dates with other sweeteners such as honey, maple syrup, or agave. However, keep in mind that the consistency may change. If you use liquid sweeteners, you might need to adjust the amount of dry ingredients, adding extra oats or cocoa powder to keep the texture right for rolling.
Are Chocolate Coconut Bliss Balls gluten-free? They can be gluten-free as long as you use certified gluten-free oats. Regular oats may be cross-contaminated during processing, so to ensure safety for those with celiac disease, always check the packaging for a gluten-free label.
How can I make these bliss balls more chocolatey? For an extra chocolate kick, consider adding chocolate chips or cocoa nibs to the mixture before rolling. Additionally, you can coat the balls lightly in melted chocolate or a cocoa powder mixture for a more decadent exterior.
Can I adjust the flavors in the bliss balls? Absolutely! Feel free to add spices like cinnamon or vanilla extract for additional flavor depth. These bliss balls are versatile, and experimenting with flavors can yield exciting results that suit your taste preferences.
How can I tell if the mixture is properly blended? Properly blended mixtures will be smooth and cohesive, not crumbly or dry. When you can easily form the mixture into balls without it falling apart, you’re good to go! If it’s too dry, add a tsp of nut milk or water; if too wet, sprinkle in a bit more oats or cocoa powder.
Conclusion:
The beauty of Chocolate Coconut Bliss Balls lies in their remarkable balance of being healthy yet indulgent at the same time. With just a few basic ingredients, you can whip up a nutritious snack that caters to a wide variety of dietary preferences and needs. Don’t be afraid to experiment and make these bliss balls your own! Whether for yourself, your kids, or as a quick snack during your busy week, they are sure to become a favorite in your household.
Now that you have the recipe and tips in hand, get into your kitchen and start making these delightful bites. You may just find yourself wanting to share them with friends, or perhaps you might want to keep them all for yourself! Enjoy your cooking adventure!
[Read also: Easy Dessert Recipes for Beginners]