Prep time: 30 minutes
Cook time: 15 minutes
Total time: 45 minutes
Servings: 12 cups
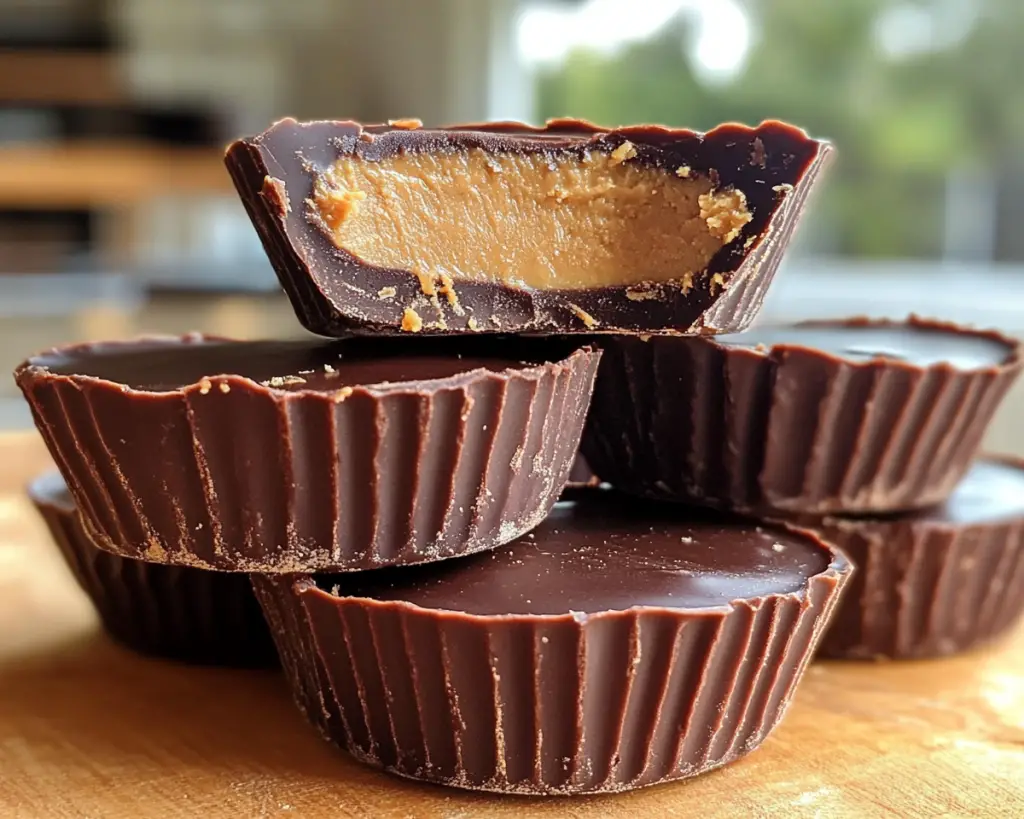
Homemade peanut butter cups are the perfect indulgence that you can make at home! They bring back the nostalgia of childhood treats while allowing you to control the ingredients. Imagine creamy, rich peanut butter enveloped in a smooth layer of chocolate — it’s a heavenly combination that satisfies your sweet tooth. Making your own peanut butter cups also eliminates preservatives and artificial flavors, making them a more wholesome choice for yourself and your family.
In this recipe, we will guide you through creating these decadent rounds of goodness. You will learn how to mix and prepare the peanut butter filling, melt the chocolate, and assemble your cups effectively. There’s a charm in creating sweet treats yourself that you’ll appreciate, especially when sharing with loved ones.
What Are Homemade Peanut Butter Cups?
Homemade peanut butter cups are a delightful confection that combines two of the most beloved flavors: chocolate and peanut butter. Originating from America, these cups typically feature a chocolate outer shell with a creamy peanut butter filling at the center. People often enjoy them as a snack, dessert, or even as an occasional treat — thanks to their rich flavor profile and satisfying texture.
The texture of homemade peanut butter cups may vary based on the ingredients and preparation method you choose. They can be soft and creamy inside with a slightly crunchy chocolate exterior, or you can make them firmer by using different ratios of chocolate and peanut butter. The flavor experience is nothing short of divine, with the sweetness of chocolate perfectly balancing the savory and nutty undertones of the peanut butter. By making them at home, you have the power to customize flavors and ingredients, tailoring them to your particular taste preferences.
Why You’ll Love This Homemade Peanut Butter Cups Recipe
There are countless reasons to fall in love with homemade peanut butter cups. First, the taste is simply irresistible; combining rich chocolate with creamy peanut butter makes for a heavenly experience that few can resist. The flavor is enhanced by using high-quality ingredients, allowing you to adjust sweetness levels and choose the type of chocolate you prefer, whether it’s milk, dark, or even a healthier option like sugar-free chocolate.
These homemade treats are also incredibly easy to make. Unlike other desserts that can require advanced baking skills or special equipment, peanut butter cups are straightforward, requiring minimal time and effort. With just a few ingredients, you can whip up a dozen or more cups in under an hour, perfect for busy parents or first-time bakers. Moreover, by making these cups at home, you save money compared to store-bought versions, and you can ensure they are made with the love and care that only homemade treats receive.
Additionally, homemade peanut butter cups are versatile; you can customize the filling with various add-ins like crushed pretzels for crunch, drizzled caramel for additional sweetness, or even a sprinkle of sea salt on top to enhance the flavor. Don’t hesitate to get creative and personalize these cups based on your dietary preferences or cravings!
Ingredients You’ll Need
- Chocolate chips: 1 cup, any variety you prefer (milk, dark, or semi-sweet). High-quality chocolate will yield better results.
- Peanut butter: 1 cup, creamy or chunky based on your taste. For a healthier option, choose natural peanut butter without added sugars or oils.
- Powdered sugar: 1/2 cup to sweeten the peanut butter filling. This creates a creamy texture and adds sweetness without grittiness.
- Butter: 1/4 cup, melted; it enhances the smooth texture of the chocolate and adds richness. You can substitute margarine if necessary.
- Vanilla extract: 1 teaspoon, optional but adds depth to the peanut butter filling.
- Salt: A pinch, enhances flavors and balances sweetness in the peanut butter filling.
How to Make Homemade Peanut Butter Cups
To create these delightful treats, follow these simple step-by-step instructions:
- Prepare your molds: Start by preparing a muffin tin or silicone molds. Line them with cupcake liners if desired for easy removal later.
- Melt the chocolate: In a microwave-safe bowl, combine your chocolate chips and butter. Microwave in 30-second intervals, stirring between each interval, until melted and smooth. This may take about 1 to 2 minutes depending on your microwave. Be careful not to overheat the chocolate, as it can seize up.
- Coat the molds: Using a spoon or a pastry brush, take a small amount of melted chocolate and swirl it around the bottom and sides of each cup in the mold. Ensure it’s evenly coated but not too thick. Place the molds in the refrigerator for about 10-15 minutes, or until the chocolate is set.
- Make the filling: In a mixing bowl, combine the peanut butter, powdered sugar, vanilla extract (if using), and salt. Mix until smooth and well-combined. Taste and adjust sweetness if necessary.
- Fill the cups: After the chocolate has set, remove the molds from the refrigerator and add a spoonful of the peanut butter mixture into each cup. Leave a little space at the top for the final layer of chocolate.
- Add the chocolate layer: Pour or spoon additional melted chocolate over the peanut butter filling in each cup, ensuring it is completely covered. Tap the mold gently on the counter to settle the chocolate and remove any air bubbles.
- Chill to set: Place the filled molds back in the refrigerator for another 15-20 minutes, or until the chocolate is solidified. Once set, they can be removed easily from the molds.
- Serve & enjoy: Once your homemade peanut butter cups are fully set, they’re ready to be enjoyed! Serve them at room temperature or chilled to maintain their perfect texture.
5 Variations & Substitutions
Nut-Free Variation: If you’re allergic to peanuts or just prefer not to use them, you can substitute the peanut butter with sunflower seed butter or another nut-free spread. This will give a similar creaminess without the allergens. The flavor will differ slightly, but it will still be delicious.
Chocolate Varieties: Feel free to switch up the chocolate. For a dark chocolate option, use dark chocolate chips, which give a more intense flavor. White chocolate can also create a unique spin on these treats! If you want something less sweet, visit the world of unsweetened baking chocolate for a richer experience.
Crunchy Peanut Butter Cups: For those who love a bit of texture, replace creamy peanut butter with a chunky version. This will create delightful bites with nut pieces throughout, adding flavor and crunch to every mouthful.
Vegan Peanut Butter Cups: For a vegan option, use dairy-free chocolate chips, and ensure the peanut butter does not contain any added sugars or dairy fillers. You can also substitute the butter with coconut oil for a rich, tropical flavor.
Flavored Peanut Butter: Experiment by adding different flavors to the peanut butter filling. Consider mixing in cocoa powder for a chocolatey twist, or even a sprinkle of cinnamon or nutmeg for a warm spice note. You could also add some crushed pretzels or toffee bits for an exciting taste and texture contrast.
Common Mistakes to Avoid
When making homemade peanut butter cups, a few common mistakes can arise, but with a little awareness, these can easily be avoided. One of the biggest pitfalls is overheating the chocolate. Always melt chocolate in short intervals and stir thoroughly, as overheating can result in a grainy or seized texture that can ruin your treat.
Additionally, not allowing the chocolate layers to set properly can lead to a messy filling that spills out of the cups upon serving. Make sure to give enough time for each chocolate layer to harden in the fridge. Also, using low-quality chocolate can compromise flavor, so choose a brand that you love or trust.
Lastly, be mindful of the proportions in your peanut butter filling. Too much powdered sugar may lead to a filling that’s overly sweet and sticky, while not enough will result in a runny mixture. Balancing the sugar and peanut butter ensures the perfect consistency and flavor.
Storage, Freezing & Reheating Tips
To store your delicious homemade peanut butter cups, keep them in an airtight container in the refrigerator. They can last for up to a week if stored properly, but you’ll likely find them devoured before that!
For longer storage, these peanut butter cups can be frozen. Place them in a single layer in a freezer-safe container or bag. They can be kept frozen for up to three months. To enjoy, simply remove them from the freezer and let them thaw at room temperature for a few minutes.
When reheating, avoid the microwave, as this can melt the chocolate quickly and ruin the texture. Instead, allow them to warm up gently at room temperature. If you’re in a hurry, a warm water bath can also be a gentle method to bring the chocolate back to a soft state.
Frequently Asked Questions
Can I use almond butter instead of peanut butter?
Absolutely! Almond butter can be used as a delicious alternative to peanut butter. It has a slightly different flavor but retains the same creamy, satisfying texture. This is a great option for those with peanut allergies or simply for a change in taste.
What type of chocolate is best for making peanut butter cups?
The best chocolate depends on your preference. Milk chocolate provides a sweeter, creamier experience, while dark chocolate offers a rich and slightly bitter taste that pairs beautifully with the sweetness of the peanut butter. You can also mix chocolates for a unique flavor profile.
Can I make them without powdered sugar?
Yes, while powdered sugar adds sweetness and helps structure the filling, you can use honey, maple syrup, or coconut sugar as substitutes. Just remember that these alternatives can change the texture slightly, making it softer. Adjust the amount to reach your desired level of sweetness.
Are homemade peanut butter cups healthier than store-bought ones?
Yes, homemade versions can be healthier! You control the ingredients, which means you can avoid additives, preservatives, and excessive sugars typically found in commercial products. Using natural ingredients also means you can cater to your dietary needs or preferences.
How do I make sure my chocolate doesn’t become grainy?
To prevent your chocolate from turning grainy or seizing up, make sure to melt it gently using short intervals in the microwave or a double boiler. If you notice it starting to seize, a tiny amount of coconut oil can be whisked in to revive its smoothness.
Conclusion:
In summary, homemade peanut butter cups are a delightful treat that combines ease, flavor, and customizability. With just a handful of simple ingredients, you can create these sweet, nutty bites that everyone will love. Don’t hesitate to experiment with flavors and textures to make this recipe uniquely yours. Treat yourself and your loved ones to these homemade delights, and enjoy the process of creating something delicious. Happy cooking, and don’t forget to share your peanut butter cup creations with friends and family!


