**Prep time**: 20 minutes
**Cook time**: 10 minutes
**Total time**: 30 minutes
**Servings**: 24 pieces
You’re not alone if you find yourself daydreaming about a sweet treat that’s both indulgent and reminiscent of childhood. One bite into a piece of homemade Rocky Road candy, and you’ll immediately recall memories of special moments filled with laughter and sharing. Perfect as a nostalgic treat for yourself or as a gift for friends and family, Rocky Road candy combines smooth chocolate, crunchy nuts, and chewy marshmallows into a delightful medley that’s hard to resist.
This decadent confection is not only easy to make but also highly customizable! In this guide, I will walk you through the process of creating your own Rocky Road candy from scratch, offering tips, variations, and everything you need to know to perfect this classic dessert. By the end, you’ll be ready to whip up batches of this delightful treat that will have everyone asking you for the recipe!
What Is Rocky Road Candy?
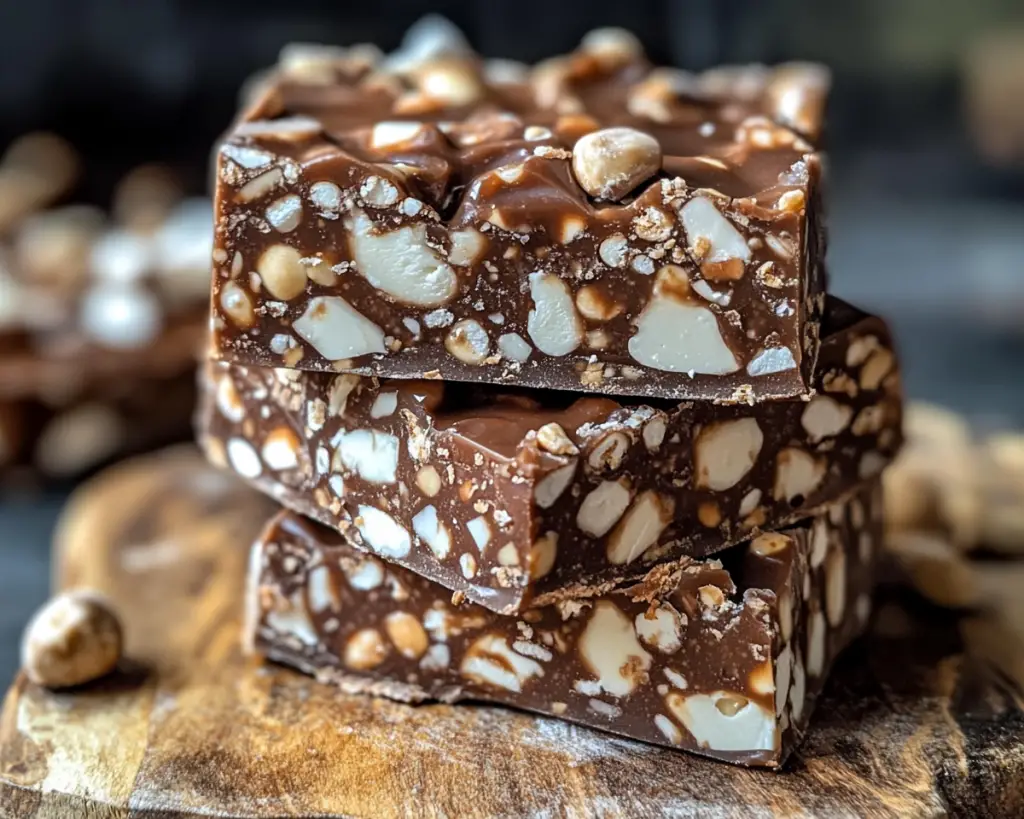
Rocky Road candy is a sweet confection characterized by its delightful blend of ingredients that together create a symphony of textures and flavors. The origins of Rocky Road date back to the 1850s in Australia, where it was first conceptualized as a flavor of ice cream made with chocolate, marshmallows, and nuts. The combination was intended to represent the rough ride or “rocky road” associated with life. Over time, the candy version emerged, showcasing the same beloved ingredients, but with a different presentation.
The classic confection usually includes **semi-sweet chocolate**, which melts smoothly and forms a rich base. The addition of **marshmallows** introduces a chewy sweetness that pairs beautifully with the crunchiness of **nuts** — typically almonds or walnuts, but you can switch these based on your taste preferences. The result is an impressive visual treat featuring a brilliant mix of colors and textures, complete with an irresistible aroma that fills your kitchen as it cooks.
Why You’ll Love This Rocky Road Candy
Rocky Road candy has a unique charm, making it a favorite among both kids and adults. Here’s why you’ll fall in love with making it:
– **Perfect for Any Occasion**: Whether it’s a holiday party, a birthday celebration, or an everyday treat, this candy adapts to any situation. You can simply box it up as a thoughtful, homemade gift for friends and family.
– **Easy to Make**: With minimal ingredients and straightforward steps, even beginners can feel confident tackling this recipe. It requires no baking and can be prepared in under 30 minutes!
– **Customizable**: Want to go gluten-free? Switch to allergen-friendly chocolate. Prefer a nut-free version? Omit the nuts or replace them with coconut flakes. You can swap out ingredients to fit any dietary restrictions or flavor preferences.
– **Rich and Satisfying**: The blend of chocolate, marshmallows, and nuts delivers a satisfyingly rich flavor profile that’s perfect for curbing any sweet tooth.
– **Great for Meal Prep**: You can make a large batch in advance, store it, and enjoy it throughout the week or save it for a future event.
No wonder Rocky Road has stood the test of time.
Ingredients You’ll Need
To make your own Rocky Road candy, gather the following ingredients:
– **2 cups semi-sweet chocolate chips**: They provide the main base for your candy, melting beautifully to create a rich, velvety chocolate layer. You can substitute with dark chocolate for a more intense flavor or milk chocolate for a sweeter treat.
– **2 cups mini marshmallows**: These little puffs add a chewy texture and sweetness. Feel free to use larger marshmallows if that’s what you have, just be sure to cut them into smaller pieces.
– **1 cup chopped walnuts or almonds**: Nuts add a delightful crunch and richness. You can replace them with pecans or your favorite nut. If you prefer a nut-free version, consider using seeds or leaving them out entirely.
– **1 tablespoon butter**: This helps to smooth out the melted chocolate, giving it a glossy finish. You may substitute with coconut oil for a dairy-free option.
– **1 teaspoon vanilla extract**: A splash of vanilla enhances the flavors of the chocolate and adds a warm aroma. You may choose to incorporate almond extract for an interesting twist.
– **Pinch of salt**: A small amount amplifies the chocolate flavor and balances the sweetness.
Let’s make sure you understand each ingredient clearly for the best rock road candy outcome.
How to Make Rocky Road Candy
Follow these simple steps to create your very own batch of Rocky Road candy:
1. **Prepare Your Pan**: Begin by preparing an 8×8 inch baking dish or a similar-sized pan. Line the bottom and sides with parchment paper for easy removal once the candy sets. This simple step ensures you won’t struggle when it comes time to cut and serve your candy.
2. **Melt the Chocolate and Butter**: Place the **semi-sweet chocolate chips** and **butter** in a heatproof bowl. You can use a microwave to melt the mixture in 30-second intervals, stirring in between to avoid burning the chocolate. Alternatively, you may melt the mixture using a double boiler on the stovetop. Aim for a smooth, glossy consistency without any lumps.
3. **Add Vanilla and Salt**: Once the chocolate is fully melted, remove it from heat. Stir in the **vanilla extract** and a **pinch of salt** until well combined. The warmth of the chocolate will help to release the flavors of the vanilla and salt, making your candy even more delicious.
4. **Incorporate Nuts and Marshmallows**: Carefully fold the **chopped walnuts or almonds** and **mini marshmallows** into the melted chocolate. Use a spatula to ensure an even mix without breaking down the marshmallows too much. You want to maintain their puffy texture.
5. **Transfer to the Pan**: Pour the chocolate mixture into the prepared baking dish. Spread it evenly into the corners with your spatula. You can also gently shake the pan back and forth to even out the mixture, ensuring an equal distribution of marshmallows and nuts across the surface.
6. **Chill and Set**: Place the pan in the refrigerator to set for about 1-2 hours or until firm. This step is crucial as it allows the chocolate to harden properly, making it easy to cut into squares or bars.
7. **Cut and Serve**: Once the Rocky Road candy is completely set, lift it out of the pan using the parchment paper. Transfer it to a cutting board and slice it into squares. This treat is perfect for sharing, so you might want to make extra!
8. **Enjoy!**: Store any leftovers in an airtight container at room temperature or in the fridge if you prefer a firmer texture.
5 Variations & Substitutions
While the classic Rocky Road recipe is undeniably delicious, there are numerous ways to make it your own. Here are five enjoyable variations:
1. **Rocky Road with Dried Fruit**: Add dried fruit like cherries or cranberries to the candy mixture. The addition of fruit adds a chewy texture and a touch of tartness that contrasts beautifully with the sweetness of the chocolate and marshmallows. This version is perfect for those who want a fruity twist on the classic recipe.
2. **Peanut Butter Rocky Road**: If you’re a fan of peanut butter, mix in 1 cup of peanut butter chips along with the chocolate. The rich, nutty flavor pairs wonderfully with the chocolate and marshmallows, creating an indulgent treat that has a creamy texture.
3. **Coconut Rocky Road**: Substitute 1 cup of chocolate with toasted coconut flakes for a tropical take on Rocky Road. This variation gives an entirely different flavor profile and adds an additional layer of crunch that complements the marshmallows nicely.
4. **Mint Rocky Road**: For a refreshing flavor, add a few drops of peppermint extract along with the vanilla. You can even fold in some crushed mint candies or chocolate mints into the mixture for extra flavor and a delightful crunch.
5. **Vegan Rocky Road**: To create a vegan version, use dairy-free chocolate and coconut oil instead of butter. Ensure your marshmallows are vegan as well. There are several brands available that offer gelatin-free options, making it easier to enjoy this treat while adhering to a plant-based lifestyle.
Common Mistakes to Avoid
When making Rocky Road candy, a few common mistakes can lead to undesirable results:
– **Overheating the Chocolate**: One of the most frequent mistakes is overheating the chocolate, which can cause it to seize and become grainy. To avoid this, melt the chocolate in small intervals and stir frequently to check for smoothness.
– **Not Chilling Long Enough**: If you rush the chilling step, your candy may not set properly, making it difficult to cut into neat squares. Ensure you allow enough time for the chocolate to harden completely, typically around 1-2 hours.
– **Overmixing the Marshmallows**: While it’s important to incorporate the marshmallows evenly, overmixing can lead to a melted mass instead of fluffy bites. Be gentle when folding in the marshmallows to keep their airy texture intact.
– **Skipping the Salt**: A pinch of salt is essential to enhance the overall flavor of your Rocky Road candy. Omitting it can result in an overly sweet treat that lacks depth.
– **Using a Too-small Pan**: Make sure to use an appropriately sized pan for your mixture. A pan that is too small can lead to overly thick candy, making it harder to set and cut. Stick to an 8×8 inch pan or similar for best results.
Storage, Freezing & Reheating Tips
Rocky Road candy is very easy to store, ensuring you can enjoy it for days to come. Here are some practical tips for storage, freezing, and reheating:
– **Storing Candy**: After cutting, place your Rocky Road pieces into an airtight container. They can be kept at room temperature for up to a week or in the fridge for about 2 weeks for a firmer texture.
– **Freezing Candy**: If you’d like to make your candy in advance or have leftovers, you can freeze the Rocky Road candy. Wrap each piece individually in plastic wrap and place them in a freezer-safe container. They can last in the freezer for up to 3 months. When you’re ready to enjoy, simply thaw the pieces at room temperature to restore their texture.
– **Reheating**: Rocky Road candy is typically enjoyed at room temperature. Reheating is not necessary or recommended, as it may lead to melting and a loss of texture.
– **Food Safety**: If you add additional perishable ingredients, such as fresh fruit, store the candy in the refrigerator and consume it within a week for optimal health and safety.
Frequently Asked Questions
1. **Can I use milk chocolate instead of semi-sweet chocolate?**
Yes, you can absolutely use milk chocolate if you prefer a sweeter flavor. The texture may be slightly different, but it will still produce delicious candy. Just note that it may not set as firmly as semi-sweet chocolate.
2. **How do I make Rocky Road candy gluten-free?**
To make Rocky Road candy gluten-free, ensure all your ingredients, including chocolate and marshmallows, are certified gluten-free. You can also choose gluten-free nuts if you’re feeling adventurous.
3. **What’s the best way to cut the candy after it sets?**
For best results, use a warm knife to cut the Rocky Road candy. Heat the knife under hot water, then dry it before cutting. The warmth will help slice through the candy without sticking.
4. **Can I add extra toppings to my Rocky Road candy?**
Absolutely! Feel free to get creative with your toppings. Crushed cookies, sprinkles, or even drizzles of white chocolate can enhance both the flavor and presentation of your candy.
5. **How do I know when my Rocky Road candy is set?**
The candy is set when it feels firm to the touch and holds its shape well. If you slightly press down on the surface and it bounces back, it’s ready. Chill it longer if any areas still feel soft.
The pleasure of enjoying Rocky Road candy lies not only in its taste but also in the joy that goes into making it. Whether you whip up a batch purely to satisfy your sweet tooth or you share it with loved ones, making Rocky Road candy is a rewarding experience.
The flexibility and ease of this recipe embody the essence of comfort food, allowing you to create a treat that perfectly suits your taste preferences or dietary needs. So, embrace your inner chocolatier, get creative, and don’t hesitate to personalize this recipe to make it your own. You might just discover a new family favorite that will bring smiles and satisfaction for years to come!
Happy cooking, and be sure to share your delicious Rocky Road candy with those you love! [Read also: Easy Dessert Recipes for Beginners]