Prep time: 20 minutes
Cook time: 40 minutes
Total time: 1 hour
Servings: 12 servings
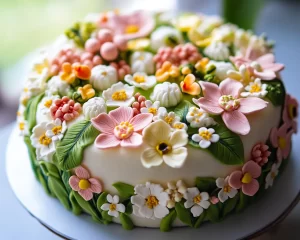
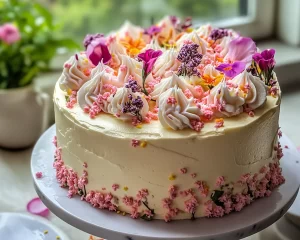
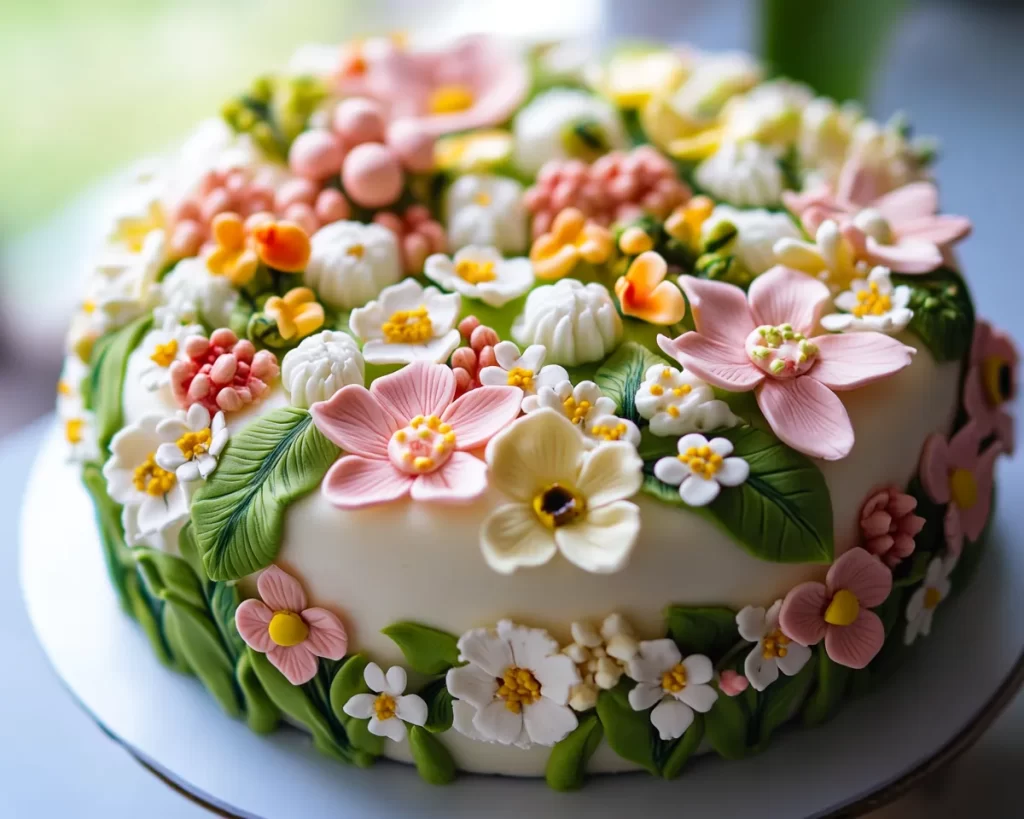
Imagine walking through a lush garden filled with vibrant blooms, their colors dancing in the sunshine, and the sweet fragrance of spring wafting through the air. This imagery reflects the essence of the Spring Garden Cake Design. Each slice of this cake is a celebration of the season, adorned with delightful floral decorations and bursting with fresh flavors that evoke memories of sunny picnics and joyful gatherings. Not only is this cake a feast for the eyes, but it also tantalizes the palate, making it perfect for any spring occasion.
This recipe is special because it combines layers of moist vanilla and lemon-infused cake, enveloped in a velvety cream cheese frosting, designed to embody the spirit of spring. Whether you’re celebrating a birthday, hosting a springtime brunch, or simply indulging yourself, this cake will not disappoint. In this article, we will guide you through the process of creating this stunning cake, sharing essential tips, variations, and common pitfalls to avoid, ensuring that your baking experience is as delightful as the end result.
What Is Spring Cake Designs: Spring Garden Cake Design?
Spring Garden Cake Design is not just a dessert; it is a visual masterpiece that captures the beauty of the season. This cake typically consists of multiple layers of soft, fluffy cake, infused with flavors that embody spring, such as subtle hints of citrus and vanilla. The frosting is rich and creamy, often made with cream cheese to provide a smooth, luscious texture that balances the sweetness of the cake.
The design of this cake is where the true artistry lies. Adorned with edible flowers and colorful fruit, it mimics a spring garden in full bloom. The vibrant colors and delightful arrangements not only make it a head-turner but also an interactive experience, inviting guests to explore the various flavors and textures present in each slice. Originating as a popular dessert for special occasions, this cake has now become a coveted recipe that fills the spring air with warmth and joy.
The playful combination of flavors and aesthetics ensures that each bite of this cake is an experience worth savoring. With its tender crumb, creamy frosting, and floral decorations, the Spring Garden Cake Design echoes the joyous celebration of new beginnings that comes with spring.
Why You’ll Love This
You will love this cake for its delightful bouquet of flavors that mirror the freshness of spring. The cake is not only delicious but also visually stunning, providing a great centerpiece for any gathering. Whether you are a baking novice or an experienced baker, the simplicity of the recipe allows you to interact with you in a creative and enjoyable way. The use of familiar ingredients keeps the cost low, catering to budget-conscious bakers while still delivering an elegant dessert experience.
One common misconception is that making such an intricate cake requires advanced baking skills; however, this Spring Garden Cake is designed to be approachable. While the design may seem sophisticated, the components are simple and manageable, allowing you to shine in the kitchen. Many compare it to traditional cakes; however, this recipe elevates the standard layer cake by incorporating delightful flavors and textures inspired by nature.
Moreover, this recipe is versatile. You can easily adapt it to cater to different dietary preferences, making it a fantastic option for various events. It is perfect for gluten-free, dairy-free, or vegan adaptations, ensuring that you can share this springtime joy with everyone.
Ingredients You’ll Need
To create your Spring Garden Cake, you’ll need the following ingredients:
- 2 cups all-purpose flour: This forms the base of the cake, providing structure. For gluten-free options, consider a gluten-free all-purpose flour blend.
- 1 ½ cups granulated sugar: This sweetens the batter and contributes to the cake’s moist texture.
- ½ cup unsalted butter, softened: Butter adds richness and flavor. You can substitute with vegan butter for a dairy-free version.
- 1 cup buttermilk: This adds moisture and a subtle tang to the cake. You can make a substitute by mixing milk with vinegar or lemon juice.
- 3 large eggs: Eggs provide structure and stability to the cake. For a vegan substitute, consider using flaxseed meal mixed with water.
- 2 teaspoons baking powder: This leavening agent helps the cake rise, producing a light and fluffy texture.
- 1 teaspoon baking soda: Another leavening agent that contributes to the cake’s rise. It also helps in browning.
- 1 teaspoon vanilla extract: This enhances the overall flavor of the cake.
- 1 tablespoon lemon zest: Fresh lemon zest gives the cake a refreshing spring flavor. Alternatively, you can use lime zest for a different twist.
- 8 oz cream cheese, softened: This is for the frosting, giving it a creamy and rich texture.
- 4 cups powdered sugar: This sweetens the frosting and adds to its smoothness.
- 2 tablespoons heavy cream: This helps to achieve the desired consistency of the frosting.
- Fresh edible flowers: These are used for decoration, adding a beautiful, natural accent to your cake.
- Fresh fruits: Berries or citrus slices make delightful additions for garnish.
Each ingredient plays a crucial role in building flavor and texture, so it’s important to measure accurately. Having everything prepped and ready to go will make the process much smoother, especially if you’re new to baking.
How to Make
Follow these simple yet thorough instructions to create your Spring Garden Cake Design:
- Preheat your oven: Start by preheating your oven to 350°F (175°C). Grease and flour two 9-inch round cake pans, ensuring they are well prepared for the batter, which helps in achieving a smooth release after baking.
- Mix the dry ingredients: In a large mixing bowl, whisk together the flour, baking powder, baking soda, and a pinch of salt. This step ensures even distribution of your leavening agents throughout the cake.
- Combine the wet ingredients: In a separate bowl, beat the softened butter and granulated sugar together until light and fluffy, about 2-3 minutes. Add the eggs one at a time, mixing well after each addition. Incorporate the buttermilk, vanilla extract, and lemon zest into the mixture, ensuring everything is well combined.
- Combine wet and dry mixtures: Gradually add the dry ingredients to the wet mixture, stirring gently until just combined. Be careful not to over-mix; this will keep your cake tender and airy. The batter should be smooth and creamy, with a light lemon scent.
- Pour and bake: Divide the batter evenly between the prepared cake pans. Tap the pans lightly on the counter to remove air bubbles. Bake in your preheated oven for 25-30 minutes, or until a toothpick inserted into the center comes out clean.
- Cool the cakes: Once baked, remove the pans from the oven and let them cool in the pans for about 10 minutes. Carefully transfer the cakes to a wire rack to cool completely. This step is vital, as it prevents the frosting from melting when you layer it.
- Prepare the frosting: In a medium bowl, beat the softened cream cheese and remaining powdered sugar together until creamy. Add the heavy cream and beat until you achieve a fluffy consistency. The frosting should be spreadable but not too runny.
- Assemble the cake: Once fully cooled, place one cake layer on a serving plate. Spread a generous layer of frosting on top, followed by the second layer of cake. Use the remaining frosting to cover the entire cake, smoothing out the sides for a finished look.
- Decorate: For the final touch, adorn your cake with fresh edible flowers and fruits. This not only enhances its visual appeal but also contributes additional flavors that are perfect for spring.
- Slice and enjoy: Allow the cake to chill in the refrigerator for at least an hour before serving to let the frosting set. When ready to savor your creation, slice it into pieces and delight in the harmonious flavors and delightful textures of your Spring Garden Cake.
This step-by-step guide ensures that each layer turns out light, airy, and full of flavor. Take your time, enjoy the process, and most importantly, have fun while creating this springtime treat!
Variations & Substitutions
Citrus Delight: If you’re looking to Zest up your Spring Garden Cake, consider incorporating additional citrus flavors. Replace some of the lemon zest with orange or lime zest for a bright, tangy flavor profile. This twists the cake into a refreshing treat perfect for warm weather, appealing to those who crave citrusy desserts.
Gluten-Free Option: For those with gluten sensitivities, substituting the all-purpose flour with a gluten-free blend is an easily adaptable variation. Make sure to choose a blend that includes xanthan gum or a similar binder to maintain the cake’s structure.
Dairy-Free Version: Opt for vegan substitutes, such as almond milk or coconut yogurt in place of buttermilk, and vegan cream cheese for the frosting. This not only caters to vegan diets but also provides a rich flavor without the dairy. The texture remains creamy, ensuring that your cake satisfies all guests.
Fruit-Filled Layers: Consider adding fresh fruit between the layers, such as strawberries, raspberries, or lemon curd for an extra flavor burst. This adds a juicy texture that complements the creaminess of the frosting, making every bite memorable.
Chocolate Variant: For chocolate lovers, try adding cocoa powder to the batter — approximately ½ cup — and intensify the frosting by adding melted chocolate for a chocolate version of this springtime classic. This variation would provide a rich and indulgent experience while still maintaining the delightful spring theme.
Strong flavors keep the recipe dynamic, and each variation allows you to personalize the cake to fit your guests and events, ensuring that every gathering is uniquely yours.
Common Mistakes to Avoid
Baking can occasionally be tricky, and there are some common mistakes that can detract from your Spring Garden Cake. One critical aspect is overmixing the batter. This can lead to a dense cake rather than a light, airy one. Mix just until the ingredients are incorporated to preserve the fluffiness of your cake.
Another frequent issue is not measuring ingredients accurately. Baking is a science, and incorrect measurements can significantly alter the results. Use a kitchen scale or measuring cups specifically for dry and liquid ingredients to ensure accuracy.
When decorating your cake, some may rush into the frosting stage without ensuring the cake is completely cool. Warm cake can cause the frosting to melt, resulting in a messy appearance. Always allow the layers to cool thoroughly.
Additionally, be mindful of the oven temperature—an oven that is too hot can cause the cake to rise too quickly and then collapse. Use an oven thermometer to verify that the temperature is accurate for consistent baking.
By being aware of these common pitfalls and knowing how to avoid them, your Spring Garden Cake will turn out perfect every time, impressing your family and friends with both its aesthetics and taste.
Storage, Freezing & Reheating Tips
Proper storage of your Spring Garden Cake is essential to ensure it remains fresh and delicious. After the cake has cooled completely, you can store it at room temperature for up to three days, covered with a cake dome or plastic wrap. This prevents it from drying out while allowing it to maintain its lovely texture.
For longer storage, consider freezing individual cake layers. To do this, wrap each layer tightly in plastic wrap and then aluminum foil to avoid freezer burn. You can securely freeze the layers for up to two months. When you’re ready to enjoy the cake, thaw the layers in the refrigerator overnight before frosting and assembling.
If you are bringing a baked cake to an event, keep in mind that it stays fresher for longer outside than inside the refrigerator due to reduced humidity levels. If it’s hot out, consider adding ice packs to your transport container to keep it cool.
If needed, you can also reheat leftover cake in the microwave for about 10-15 seconds to restore its soft texture. Make sure to keep the cake covered with a damp paper towel while reheating to keep it from drying out.
By following these tips, you can ensure your Spring Garden Cake remains a delightful treat even days after baking.
Frequently Asked Questions
Can I use different flavors for the cake besides vanilla? Absolutely! You can customize the cake flavor by inserting flavors such as almond, lemon, or orange. Just be sure to maintain the proportions for dry and wet ingredients to keep the cake’s structure.
What type of flowers are safe to use for decoration? Edible flowers like pansies, nasturtiums, and violets can add a beautiful touch to your cake. Just ensure that they have not been treated with pesticides or chemicals that may be harmful.
How can I make the frosting less sweet? If you find the frosting too sweet, consider adding a pinch of salt or more cream cheese to balance out the sweetness. You can also add a splash of lemon juice for a tangy flavor, which can enhance the overall taste.
Is it possible to make this cake ahead of time? Yes, you can bake and freeze the cake layers ahead of time. Just thaw when needed and frost just before serving for the best flavor and texture.
Can the cake be made gluten-free? Yes, substituting all-purpose flour with a gluten-free blend will work, but ensure that your blend contains a stabilizing agent like xanthan gum. This will help maintain the cake’s structure.
Conclusion:
The Spring Garden Cake Design is more than just a dessert; it is a celebration of flavors, textures, and creativity. With simple ingredients and approachable methods, you can craft a stunning centerpiece for any spring gathering. Experiment with the tips and variations provided, and embrace the joy of baking. Try it out, share it with loved ones, and let this cake inspire delightful memories of the beauty of spring. Happy baking!